

SnowSQL commands for uploading, managing, and previewing files in Snowflake stages. Master PUT, REMOVE, and SELECT with real examples and Pro Tips
Introduction
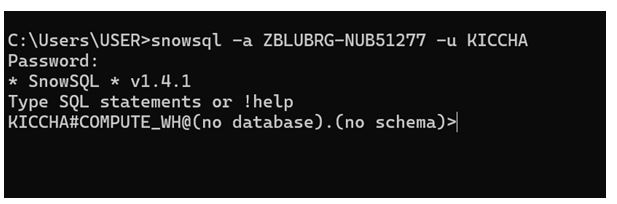
In real-world Snowflake environments, working efficiently with data files is critical. While the web interface makes loading simple, large-scale or automated operations require something more powerful — that’s where SnowSQL, Snowflake’s command-line interface, comes in.
SnowSQL provides complete control over data staging, file management, and loading automation. It’s the preferred tool for enterprise engineers managing terabytes of data daily.
In this guide, we’ll focus on SnowSQL’s staging operations — uploading, overwriting, removing, and verifying files in internal stages. These form the foundation for building scalable and script-driven data ingestion pipelines in Snowflake.
SnowSQL Command-Line Interface
Uploading Files to Internal Stages (PUT Command)
The PUT command is one of the most essential operations in SnowSQL. It uploads data files from your local machine to an internal stage inside Snowflake, preparing them for loading into tables.
Syntax :
PUT file://C:\Users\USER\Downloads\PART.csv @stage_csv;
Explanation:
file://– Specifies the local path of your file.@stage_csv– Indicates the target internal stage where files will be stored.
Once executed, SnowSQL securely uploads your file to Snowflake’s internal storage layer. You’ll see output logs showing progress, compression status, and final upload confirmation.

Successful PUT Command
Note : PUT & GET are only 2 commands which will not work in UI
Pro Tip:
Use AUTO_COMPRESS=TRUE during upload for faster transfer and reduced storage costs. Snowflake automatically decompresses during load.
Common Mistake:
The PUT command cannot be used from the Snowflake UI — it only works through SnowSQL CLI.
Overwriting or Skipping Files (OVERWRITE=TRUE)
When you upload the same file name multiple times, Snowflake automatically checks for duplicates using an MD5 checksum. By default, it skips existing identical files to save time and credits.
If you need to replace an older version, use the OVERWRITE=TRUE parameter.
Example :
PUT file://C:\Users\USER\Downloads\PART.csv @stage_csv OVERWRITE=TRUE;
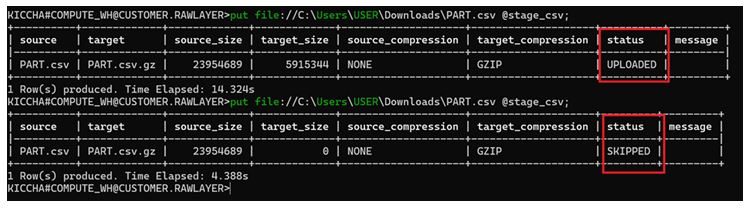
This forces Snowflake to overwrite any file with the same name in the stage. It’s helpful when working with periodically updated datasets.

PUT Command with OVERWRITE Flag
As you can see above when we used overwrite = true the same file has been uploaded again
Pro Tip:
Use OVERWRITE=TRUE carefully in production pipelines. Always verify that no concurrent jobs depend on the old file before replacement.
Common Mistake:
Assuming OVERWRITE=TRUE keeps older versions — it doesn’t. Once replaced, old file data cannot be retrieved.
Removing Files from Stages (REMOVE Command)
The REMOVE command cleans up files from your Snowflake stage. It’s an essential part of stage management, preventing unnecessary storage costs and confusion.
Examples :
REMOVE @stage_csv;
REMOVE @stage_csv/Customer.csv;
Explanation:
- The first command removes all files within the stage.
- The second removes a specific file only.
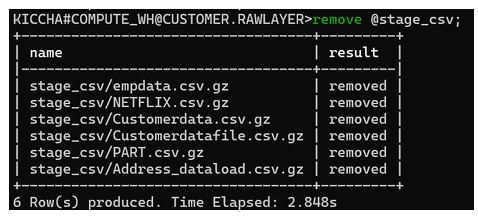
File Deletion Confirmation
Pro Tip:
Always check stage contents using LIST before deleting. Once removed, files cannot be recovered.
Common Mistake:
Snowflake does not have a “trash” or recovery area for removed staged files — deletion is permanent.
Uploading Multiple Files Using Wildcards
When working with batch uploads, you can use the wildcard * to push multiple files in a single command. This saves time and simplifies data ingestion workflows.
Example :
PUT file://C:\Users\USER\Downloads\sampledata\*.csv @stage_csv;
This command uploads all CSV files from the specified folder into the @stage_csv internal stage.
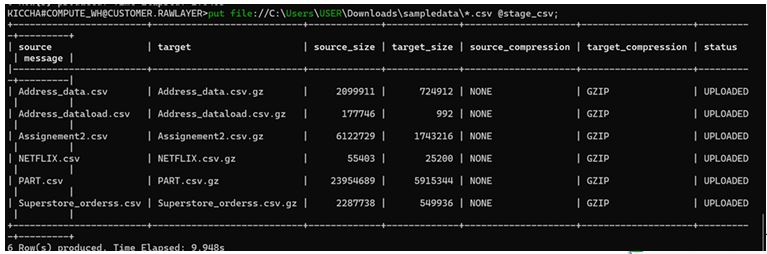
Bulk PUT Command
SnowSQL automatically performs parallel uploads, improving throughput for large datasets.
Best Practice :
Compress your batch files (e.g., .csv.gz) to reduce upload time and network bandwidth.
Pro Tip:
Use consistent naming conventions such as sales_2025_Q1.csv or region_us.csv — this helps manage files efficiently when working with wildcards.
Common Mistake:
Uploading hundreds of small files individually reduces performance. Instead, consolidate them into fewer large files for faster COPY INTO operations later.
Checking File Data Inside a Stage
Before loading files into tables, it’s a good practice to preview staged data. SnowSQL lets you do this using a simple SELECT query against the stage.
Example :
SELECT $1, $2, $3 FROM @stage_csv/Customerdata.csv;
Explanation:
$1,$2,$3refer to column positions in the flat file.- Works best for text-based formats like CSV or TSV.
This step allows you to confirm file integrity — ensuring headers, delimiters, and values are correct before loading into target tables.
Pro Tip:
Use this method to validate file structure and encoding before running COPY INTO. It can save hours of debugging malformed rows later.
Common Mistake:
File names in Snowflake are case-sensitive — make sure you match the exact file name, including the extension, in your query.
Real-World Workflow Example
To see these commands in action, let’s walk through a typical SnowSQL staging workflow:
- Upload Files
PUT file://C:\Users\USER\Downloads\sales_data.csv @stage_sales; - Verify Upload
LIST @stage_sales; - Preview Data
SELECT $1, $2, $3 FROM @stage_sales/sales_data.csv; - Remove Processed Files
REMOVE @stage_sales/sales_data.csv; - Proceed to Data Loading
COPY INTO SALES_TABLE FROM @stage_sales FILE_FORMAT = (TYPE = 'CSV');
This end-to-end process ensures your files are correctly staged, validated, and loaded with confidence.

CLI Workflow Overview
Summary & Key Takeaways
- SnowSQL empowers engineers with precise control over data staging and file management.
- Use
PUTfor uploads,OVERWRITEfor updates,REMOVEfor cleanup, andSELECTto preview data. - Combine these commands into automated scripts to streamline ETL and batch data loads.
- Efficient staging directly impacts query performance, credit usage, and overall data reliability.
- These SnowSQL techniques are crucial for both production operations and SnowPro Core exam preparation.
Next Steps & Resources
Now that you’ve mastered file uploads and stage management, you’re ready for the next step:
“Loading Data with COPY INTO and Error Handling in Snowflake.”
Recommended Resources:
- [Snowflake Documentation: SnowSQL Command-Line Client]
- [Snowflake Docs: PUT and GET Commands]
- [Managing Staged Data in Snowflake]
Experiment with these commands in a Snowflake trial account, explore the QUERY_HISTORY view, and monitor file-level performance metrics.