

Understanding Internal Stages in Snowflake — The Foundation of Data Loading
Introduction
In Snowflake, stages form the backbone of the data loading process. Whether you’re importing structured data from CSV files or semi-structured JSON from cloud storage, stages act as the intermediate storage layer between your external sources and Snowflake tables.
For any data engineer or SnowPro Core Certification candidate, mastering stages is essential. Internal stages are particularly important for quick, secure uploads directly into Snowflake without external dependencies.
In this tutorial, we’ll explore Internal Stages in Snowflake — how to create them, manage them, upload files through the web interface, and verify uploads efficiently. We’ll also discuss practical limits, real-world workflows, and best practices for production environments.
What Are Stages in Snowflake?
A stage in Snowflake is a temporary or permanent location used to store files before loading them into tables or unloading data back to cloud storage.
Stages act as buffer zones, ensuring data is easily accessible to Snowflake’s compute layer for ingestion or export.
There are three types of stages in Snowflake:
- Internal Stages — Managed completely within Snowflake’s environment.
- External Stages — Linked to cloud storage such as Amazon S3, Azure Blob, or Google Cloud Storage.
- Table/User Stages — Automatically available per user or per table for temporary file storage.
In this post, we’ll focus on Internal Stages, which provide the simplest and most secure way to load data directly into Snowflake.
Creating Internal Stages
Internal stages are created within a specific database and schema. They can also include file format specifications to define how Snowflake should interpret the files during load operations.
Here’s the basic syntax from the PDF reference:
CREATE STAGE stage_csv
FILE_FORMAT = 'CSVTYPE';
- stage_csv — The name of your stage.
- FILE_FORMAT — Defines how Snowflake interprets files (e.g., CSV, JSON, PARQUET).
Always ensure you are in the correct database and schema context before creating a stage:
USE DATABASE SALES_DB;
USE SCHEMA RAW;
CREATE STAGE stage_csv FILE_FORMAT = 'CSVTYPE';
Pro Tip: Always define the file format during stage creation. This helps standardize how files are parsed when using COPY INTO commands later.
Common Mistake: Forgetting to select the right schema before executing the CREATE STAGE command. If you don’t specify it, your stage may be created in an unintended context.
Viewing Available Stages
To view all the stages within your current account and schema, use the following SQL command:
SHOW STAGES;
This displays a list of stages along with their metadata — name, owner, creation time, file format association, and URLs (for external stages).
You can also filter the output for readability:
SHOW STAGES LIKE '%csv%';
This command helps locate stages with specific naming patterns.
Pro Tip: Use the LIKE filter or query the INFORMATION_SCHEMA.STAGES view for large environments to quickly find specific stages.
Common Mistake: Confusing user stages with named internal stages. User stages are temporary, while named internal stages persist across sessions.
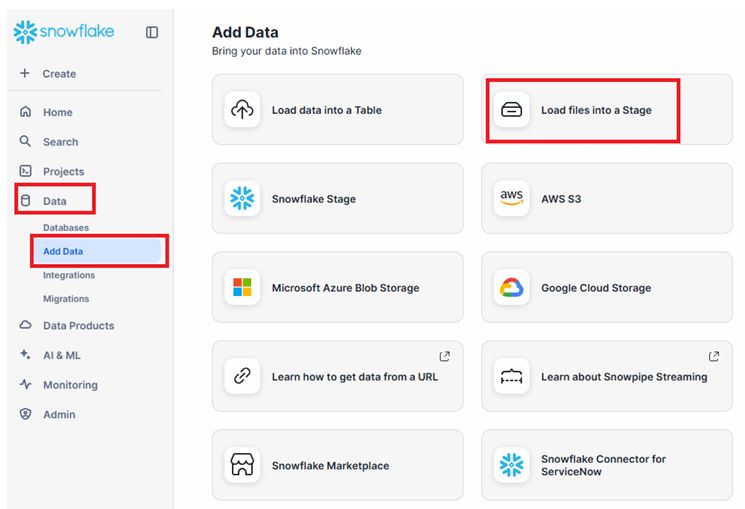
Loading Files into an Internal Stage via the Snowflake UI
Snowflake provides an easy-to-use graphical interface for uploading files directly into internal stages — ideal for quick testing or small data uploads.
Follow these steps:
- Navigate to Data → Databases → Stages in the Snowflake web interface.
- Select your target stage.
- Click Upload File.
- Choose one or multiple files from your system.
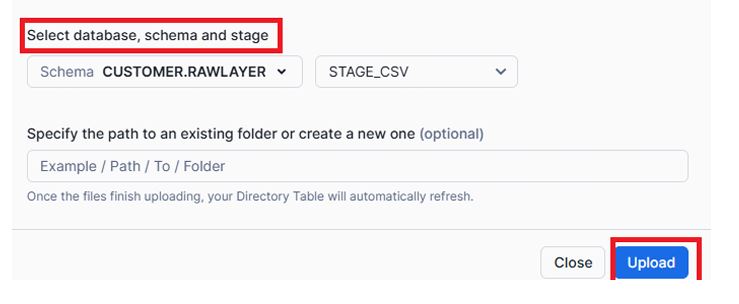
- Specify the Database, Schema, and Stage.
- Confirm upload.
Upload Files to Stage via UI
Once uploaded, the files become immediately available for loading into Snowflake tables using COPY INTO commands.
Browse and you can also upload multiple files and select database , schema and stage and then hit upload

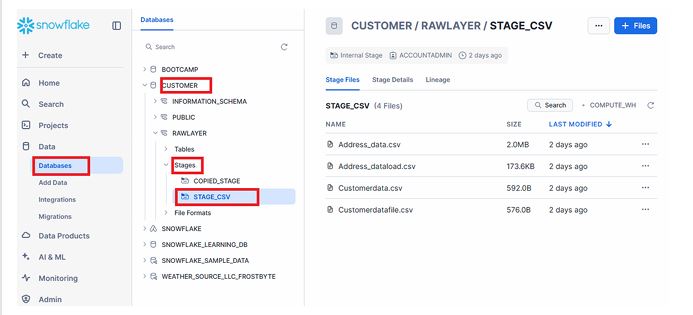
Now you will find these files in Databases in data section.
Pro Tip: Use the UI method for small datasets (less than 250 MB). It’s fast and convenient for development and testing.
Common Mistake: Attempting to upload large files through the UI. Files exceeding 250 MB must be uploaded using SnowSQL PUT command or through External Stages.
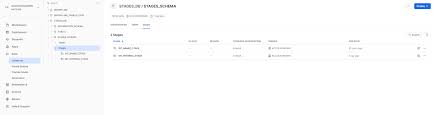
Listing Files in a Stage
To verify which files are currently stored in your stage, use the LIST command:
LIST @stage_csv;
The @ symbol refers to the stage location. The command output includes file names, sizes, and timestamps.
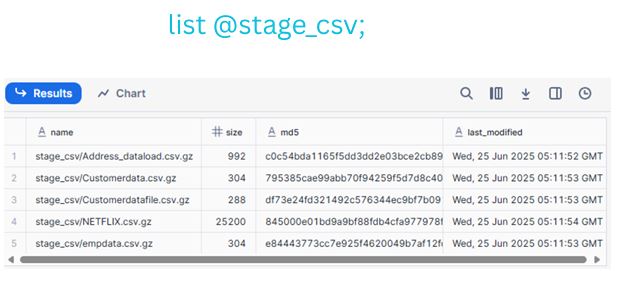
LIST Command Output
This helps confirm your uploads and ensures that Snowflake recognizes the files before initiating data load operations.
Pro Tip: Run LIST before every COPY INTO to ensure the correct file set is loaded.
Understanding File Size Limits
The PDF specifies that files uploaded via the Snowflake web interface cannot exceed 250 MB.
For larger files, Snowflake documentation recommends:
- Using the SnowSQL PUT command, which uploads files directly from your local machine.
- Leveraging External Stages (Amazon S3, Azure Blob, or GCS) for scalable, multi-GB ingestion workflows.
For example, with SnowSQL:
PUT file://data/sales_2025.csv @stage_csv auto_compress=true;
Snowflake automatically compresses and transfers files efficiently.
Real-World Workflow Example
Here’s a practical workflow for a data engineer preparing to load daily CSV data:
- Create Stage:
CREATE STAGE stage_csv FILE_FORMAT = 'CSVTYPE'; - Upload File:
Use the UI to uploaddaily_sales.csv. - Validate File:
LIST @stage_csv; - Load Into Table:
COPY INTO sales_data FROM @stage_csv FILE_FORMAT = (FORMAT_NAME='CSVTYPE');
This flow demonstrates the complete journey from staging to loading — the foundation of Snowflake’s data pipeline.
Best Practices for Working with Internal Stages
- Keep filenames consistent — This simplifies automation and tracking.
- Compress files before upload — Use
.gzor.zipto save storage and improve upload speed. - Clean up unused files — Internal stages consume Snowflake storage; delete files once loaded.
- Use SnowSQL for automation — Script uploads for nightly ETL or batch jobs.
Pro Tip: Validate file formats before loading to avoid errors during the COPY INTO process.
Common Mistake: Leaving large files in stages indefinitely. Internal stage storage contributes to overall account costs.
Summary & Key Takeaways
- Internal Stages are secure, Snowflake-managed storage areas for uploading and staging files before ingestion.
- Upload small files (≤250 MB) using the Snowflake UI, and large files via SnowSQL or External Stages.
- Use
SHOW STAGESto view available stages andLIST @stage_nameto monitor uploaded files. - Stages are integral to Snowflake’s data ingestion pipeline, bridging your file systems and Snowflake tables seamlessly.
We will discuss SNOWSQL &External Stages in NEXT Parts
Next Steps / Resources
Now that you understand Internal Stages, your next step is to explore External Stages — connecting Snowflake directly with cloud storage for large-scale ingestion.
Recommended resources:
- [Snowflake Documentation: Loading Data Using Stages]
- [Snowflake Documentation: PUT and GET Commands in SnowSQL]
Hands-on Practice:
- Create your own internal stage.
- Upload a small CSV file through the Snowflake UI.
- Run
LIST @stage_name;to verify your upload. - Load data into a test table using
COPY INTO.