

Learn how to install, configure, and connect SnowSQL — Snowflake’s command-line interface — for smooth data engineering workflows and stage management.
Introduction
SnowSQL is Snowflake’s official command-line client — a lightweight yet powerful interface designed for automation, large file handling, and advanced control over Snowflake operations. While the web UI is ideal for quick interactions, SnowSQL is indispensable for serious data engineers who want efficiency, repeatability, and automation in their workflows.
If you’re preparing for SnowPro Core Certification or managing real-world data pipelines, mastering SnowSQL is essential. It enables you to run SQL commands, manage data stages, upload or remove files, and monitor your Snowflake environment directly from the command line.
In this tutorial, we’ll explore the core setup and connection steps — from installation to verifying your environment and viewing stages. By the end, you’ll have SnowSQL ready to interact with your Snowflake account confidently.
Setting Up SnowSQL
Step 1: Download the Installer
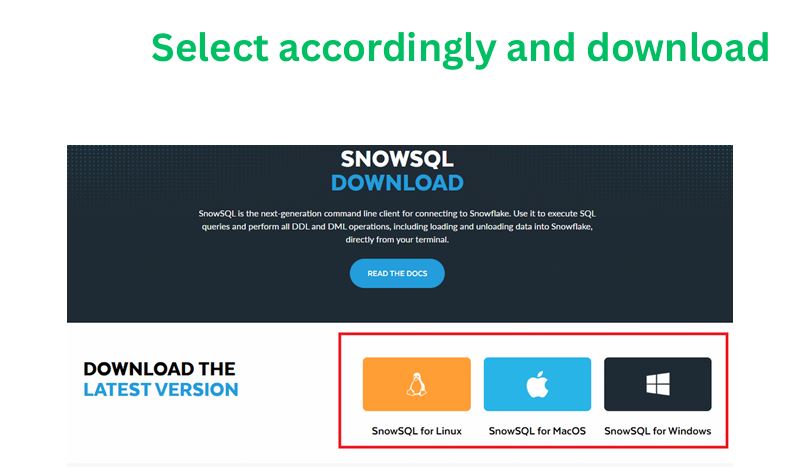
SnowSQL is available for Windows, macOS, and Linux.
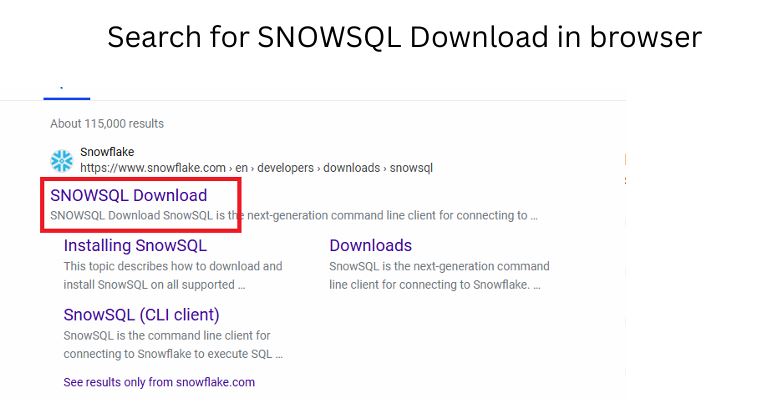
You can download it directly from Snowflake’s official page by searching “SnowSQL Download” in your browser or visiting the Snowflake Documentation Portal.
Choose the installer based on your operating system and follow on-screen instructions.
SnowSQL Installation Screen
Step 2: Installation
The installation is straightforward:
- Run the installer and follow the prompts.
- Accept the license terms.
- Once installed, verify the installation path (default paths vary by OS).
After installation, open your terminal or command prompt and run:
snowsql -v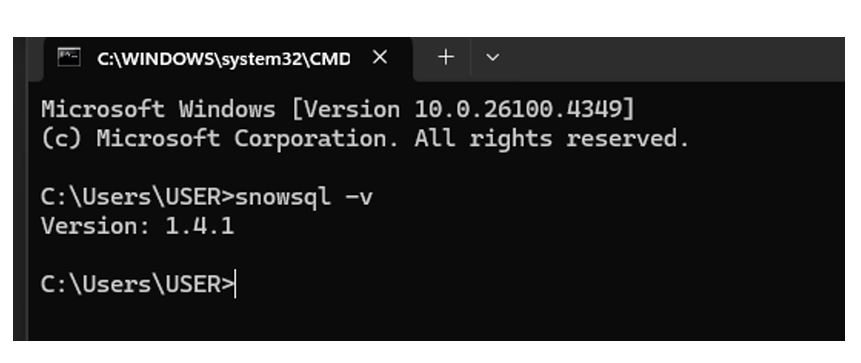
If the installation is successful, this command returns the current SnowSQL version.
Pro Tip: Always use the latest SnowSQL version to access new features and compatibility with Snowflake’s evolving platform.
Common Mistake: Installing SnowSQL but forgetting to add it to your system’s PATH variable. Without this, CLI commands won’t run until the correct path is set.
Step 3: Prerequisites
Before connecting:
- Ensure you have an active Snowflake account.
- Verify that your network/firewall allows outbound connections to Snowflake’s endpoints.
- Have your account name, username, and role credentials ready.
Connecting SnowSQL to Snowflake
The SnowSQL connection follows a simple syntax pattern:
snowsql -a <account_name> -u <username>
Understanding the Parameters:
- -a → Account name or identifier (from your Snowflake URL, e.g.,
abc12345.ap-south-1) - -u → Your Snowflake username
- Other Snowflake commands:
-r→ Role name (e.g., SYSADMIN)-d→ Database name (e.g., CUSTOMER_DB)-s→ Schema name (e.g., RAW)-w→ Warehouse name (e.g., COMPUTE_WH)
Example command:
snowsql -a xy12345.ap-south-1 -u john_doe -r SYSADMIN -d SALES_DB -s PUBLIC -w COMPUTE_WH
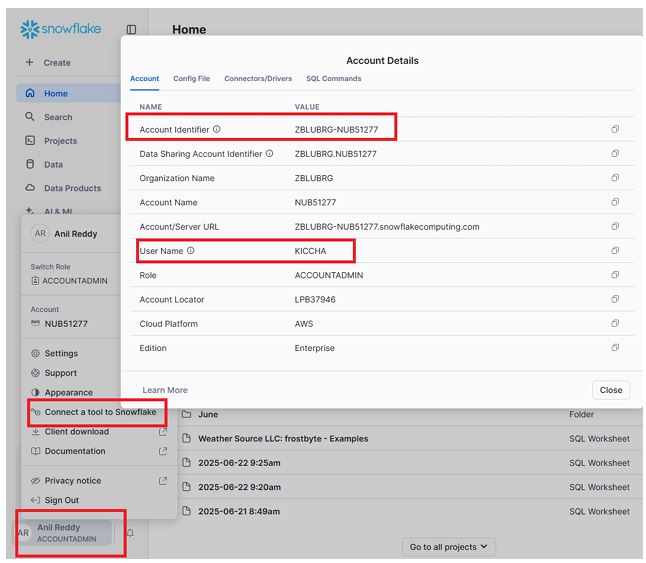
Here you will get account name and username.
Account Admin ⟶ Connecta a tool to Snowflake
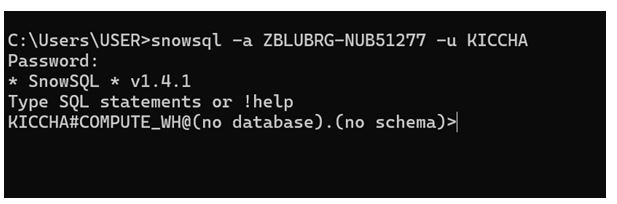
CLI Login Prompt
Once executed, SnowSQL will prompt for your password securely.
After successful login, you’ll see a CLI interface ready for commands.
Pro Tip:
Use the configuration file ~/.snowsql/config to store common connection settings (like account, username, role). You can define named connections (aliases) so you only type:
snowsql -c prod
to connect to your production environment.
Common Mistake:
Including .snowflakecomputing.com in the account name. SnowSQL automatically appends this domain — use only the prefix (e.g., xy12345.region).
Below I have provided account name and user name:
Verifying Connection and Context
Once you’re connected, confirm your working context using the following SQL commands:
USE WAREHOUSE COMPUTE_WH;
USE DATABASE CUSTOMER_DB;
USE SCHEMA RAW;
These commands tell Snowflake which warehouse, database, and schema your operations will execute against.
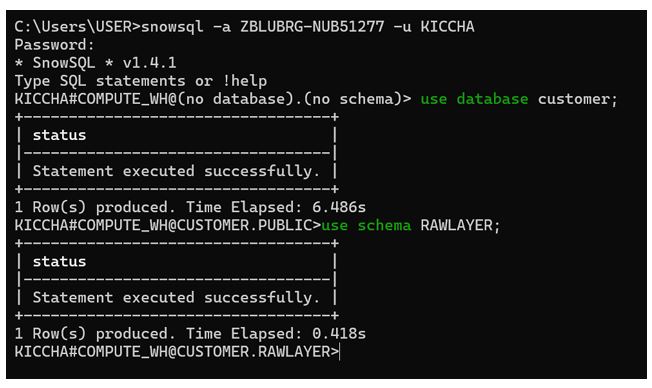
Successful Connection in CLI
Now you are in compute WH , customer database and raw layer schema
To check your current session context, use:
SELECT CURRENT_ROLE(), CURRENT_WAREHOUSE(), CURRENT_DATABASE(), CURRENT_SCHEMA();
This verifies that your role and context are correctly set.
Pro Tip:
Always set the context explicitly in scripts — it ensures your queries execute in the right environment, especially when automating pipelines.
Common Mistake:
Running queries without verifying the current context — this can lead to writing data into the wrong schema or database.
Viewing Stages and Files
Stages in Snowflake act as temporary storage for data files before loading them into tables. Once SnowSQL is connected, you can view available stages using:
SHOW STAGES;
This command lists all stages accessible in your current schema, including:
- Stage Name
- Owner
- Type (internal/external)
- Comment
- URL (for external stages)
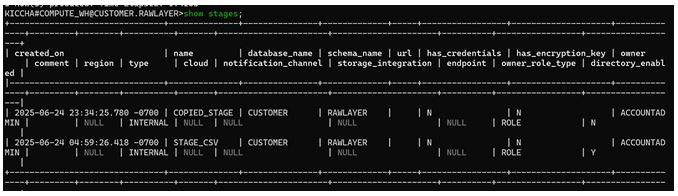
SHOW STAGES Output in SnowSQL
You can further check which files exist in a particular stage using the LIST command:
LIST @stage_csv;
Here, the @ symbol denotes that you’re referencing a stage object.
This command returns:
- File name
- Size
- Last modified timestamp
- Compression type (if applicable)
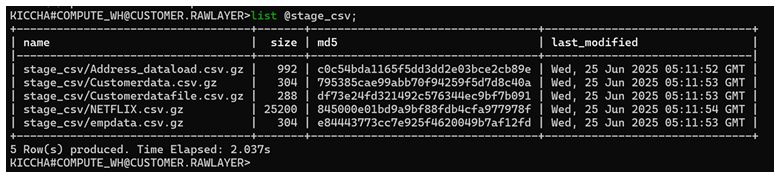
LIST Command Output
These commands are especially useful for validating uploaded files before performing data loading operations.
Pro Tip:
Filter your results for large environments using SQL-like patterns, such as:
SHOW STAGES LIKE '%csv%';
Common Mistake:
Running LIST without specifying the correct stage name or schema context — ensure you’re using the same context where the stage was created.
Summary & Key Takeaways
- SnowSQL is Snowflake’s command-line client, essential for automation, large-scale data operations, and professional workflows.
- Installation is simple — verify with
snowsql -vafter setup. - Use
snowsql -a <account> -u <user>to connect; store configurations in~/.snowsql/configfor faster logins. - Always verify your warehouse, database, and schema context using
USEcommands. - Explore and validate data staging using
SHOW STAGESandLIST @stage_name.
Next Steps
This post focused on installation, setup, and viewing stage files using SnowSQL.
In the next tutorial, we’ll dive deeper into file uploads, management (PUT, REMOVE, OVERWRITE), and stage operations — essential for automated data loading pipelines.
Further Learning Resources: