

Dynamic Data Masking in Snowflake is a security feature that enables controlling data visibility at query time based on the user’s role. It protects sensitive information such as phone numbers, account balances, and emails by masking or obfuscating data dynamically without altering the stored values.
What Is Dynamic Data Masking?
Dynamic Data Masking allows restricting sensitive data so different roles see different versions of the same data. Authorized roles can view the full values, while other roles see partial or fully masked versions. This is achieved without modifying or duplicating the actual underlying data.
Key Use Case Scenarios
- Hiding personally identifiable information such as SSNs, phone numbers, and account balances.
- Showing different data views depending on user roles (for example, Admins view full data while Interns view masked data).
- Enforcing compliance with privacy regulations including GDPR and HIPAA.
Benefits
- No data duplication or modification.
- Simple to enable and control.
- Supports role-based, dynamic masked data views.
- Auditable and traceable masking logic.
Important Notes
- Masking policies can only be applied to objects they are not attached to currently.
- Use
information_schema.policy_referencesto identify where masking policies are applied. - Enterprise Edition and above supports Dynamic Masking.
Summary
Dynamic Data Masking in Snowflake offers a secure and low-code way to ensure sensitive data access is restricted based on user roles. It adds a dynamic, policy-driven layer of protection, especially in environments where multiple users require varying visibility levels.
Practical Implementation
The following steps outline the complete implementation of dynamic masking, including creating roles, applying masking policies, modifying policies, and identifying where masking is applied.
Creating Roles
CREATE ROLE SALES_USERS;
CREATE ROLE SALES_ADMIN;
CREATE ROLE MARKET_USERS;
CREATE ROLE MARKET_ADMIN;
To grant these roles to a user, identify your username:
SELECT CURRENT_USER();
Then assign the roles:
GRANT ROLE SALES_USERS TO USER KICCHA;
GRANT ROLE SALES_ADMIN TO USER KICCHA;
GRANT ROLE MARKET_USERS TO USER KICCHA;
GRANT ROLE MARKET_ADMIN TO USER KICCHA;
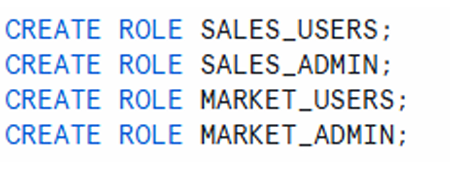
four roles created—SALES_USERS, SALES_ADMIN, MARKET_USERS, MARKET_ADMIN
Grant Roles to USER, my user name is KICCHA & yours will be different. To know your userName
execute below select command.
select current_user();
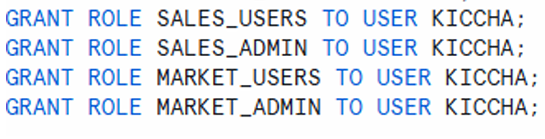
roles granted to a sample user
Create a Schema and Table
A schema is created to organize masking policies, followed by a sample table to apply masking.
CREATE SCHEMA MYPOLICIES;

CREATE TABLE MYPOLICIES.CUSTOMER
AS SELECT * FROM SNOWFLAKE_SAMPLE_DATA.TPCH_SF1.CUSTOMER;
The CUSTOMER table includes multiple columns, and in this implementation, the phone number and account balance columns are selected for masking.
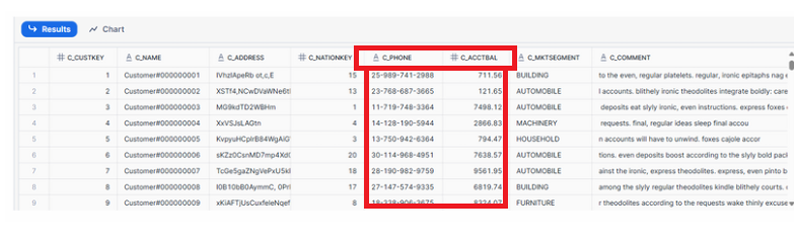
Table preview highlighting C_PHONE and C_ACCTBAL columns intended for masking
Grant Access to All Other Roles
All roles must be granted permissions on the database, schema, and target table.
GRANT USAGE ON DATABASE BOOTCAMP TO ROLE sales_users;
GRANT USAGE ON SCHEMA BOOTCAMP.mypolicies TO ROLE sales_users;
GRANT SELECT ON TABLE BOOTCAMP.mypolicies.CUSTOMER TO ROLE sales_users;

GRANT USAGE ON DATABASE BOOTCAMP TO ROLE sales_admin;
GRANT USAGE ON SCHEMA BOOTCAMP.mypolicies TO ROLE sales_admin;
GRANT SELECT ON TABLE BOOTCAMP.mypolicies.CUSTOMER TO ROLE sales_admin;

GRANT USAGE ON DATABASE BOOTCAMP TO ROLE market_users;
GRANT USAGE ON SCHEMA BOOTCAMP.mypolicies TO ROLE market_users;
GRANT SELECT ON TABLE BOOTCAMP.mypolicies.CUSTOMER TO ROLE market_users;

GRANT USAGE ON DATABASE BOOTCAMP TO ROLE market_admin;
GRANT USAGE ON SCHEMA BOOTCAMP.mypolicies TO ROLE market_admin;
GRANT SELECT ON TABLE BOOTCAMP.mypolicies.CUSTOMER TO ROLE market_admin;
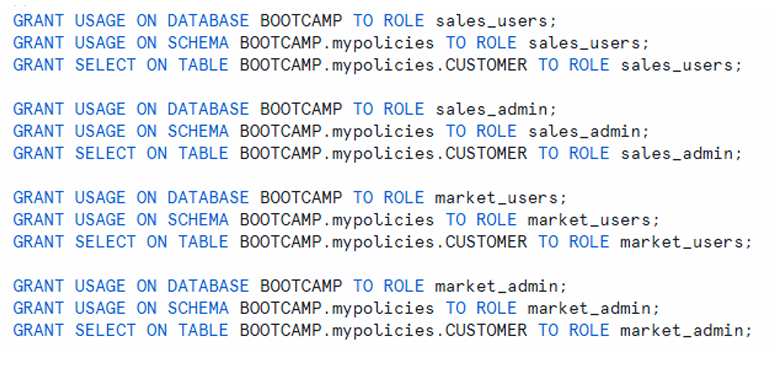
Role access matrix showing each role receiving appropriate usage and select privileges
Hiding Customer Phone Number
A masking policy is created to hide customer phone numbers based on the user’s role.
CREATE OR REPLACE MASKING POLICY customer_phone
AS (val string) RETURNS string ->
CASE WHEN CURRENT_ROLE() IN ('SALES_ADMIN', 'MARKET_ADMIN') THEN val
     ELSE '##-###-###'||SUBSTRING(val,12,4)
END;
Key details:
- The masking policy is named
customer_phone. - Accepts a string input such as a phone number.
- Users with roles SALES_ADMIN or MARKET_ADMIN see the full phone number.
- All other roles see a masked version.
- The masked version retains the last four digits.
SUBSTRING(val, 12, 4)extracts the last four characters.- This approach protects sensitive phone information while allowing limited visibility.

panel describing how full phone numbers are shown to admin roles while user roles see partially masked data
Applying Masking Policy on CUSTOMER Table
ALTER TABLE MYPOLICIES.CUSTOMER
MODIFY COLUMN C_PHONE
SET MASKING POLICY customer_phone;
Behavior comparison:
- When role is
sales_admin, the full phone number is visible. - When role is
sales_users, the phone number is masked. - Only the last four digits remain unmasked.
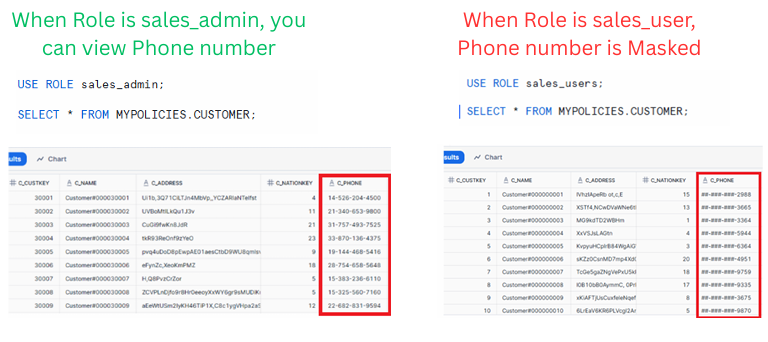
Side-by-side view showing unmasked phone numbers for admin roles and masked phone numbers for user roles
As you can see only last 4 numbers of Customer phone number is visible and rest is Masked.
Updating Requirements: Mask Entire Phone Number
If business requirements change and the entire phone number must be masked, the masking policy can be altered.
ALTER MASKING POLICY customer_phone SET body ->
CASE WHEN CURRENT_ROLE() IN ('SALES_ADMIN', 'MARKET_ADMIN') THEN val
     ELSE '##########'
END;
After altering:
- Admin roles still view the full phone number.
- User roles see all digits masked.
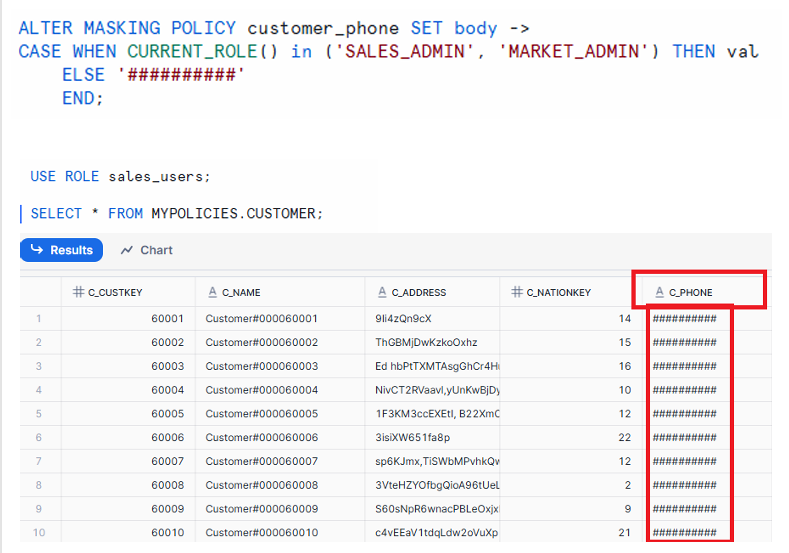
Table display showing fully masked phone numbers for roles without admin privileges.
Now as per Client requirement we have Masked entire Phone Number.
Hiding Customer Account Balance
A separate masking policy protects customer account balance information.
CREATE OR REPLACE MASKING POLICY customer_accbal2
AS (val number) RETURNS number ->
CASE WHEN CURRENT_ROLE() IN ('SALES_ADMIN', 'MARKET_ADMIN') THEN val
     ELSE 0
END;
Important note:
Numeric fields must use 0 for masking instead of characters such as ###.
Apply the policy:
ALTER TABLE MYPOLICIES.CUSTOMER
MODIFY COLUMN C_ACCTBAL
SET MASKING POLICY customer_accbal2;
Behavior details:
- Admin roles can view actual account balances.
- User roles see account balance as 0.
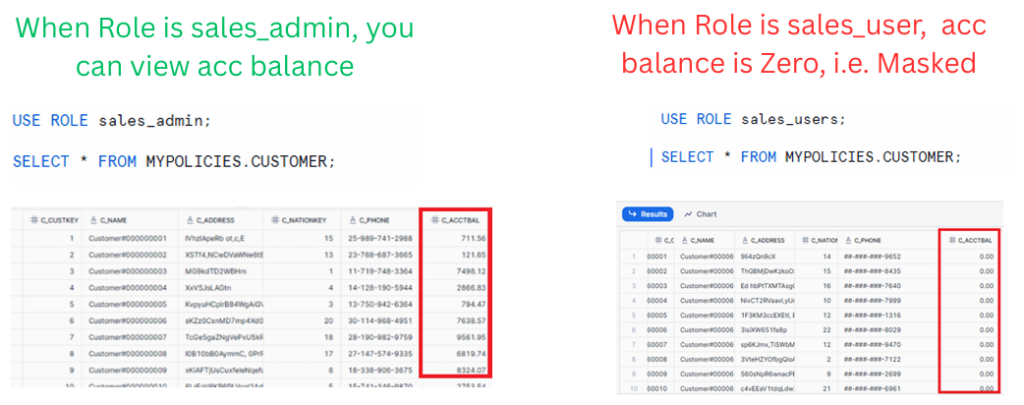
Panels showing real balance values for admin roles and masked balance values (zero) for user roles.
Managing Masking Policies
Snowflake provides multiple ways to inspect and manage masking policies.
List All Available Masking Policies
SHOW MASKING POLICIES;

Table listing masking policies such as CUSTOMER_PHONE and CUSTOMER_ACCBAL2 with associated schemas and creation timestamps.
View the Definition of a Specific Policy
DESC MASKING POLICY CUSTOMER_PHONE;

Policy definition showing input type, return type, and masking logic
Find Where a Masking Policy Is Applied
SELECT * FROM TABLE(information_schema.policy_references(policy_name=>'CUSTOMER_PHONE'));
This identifies all tables and columns using the specified masking policy.

Table listing columns and objects referencing CUSTOMER_PHONE masking policy
How to Alter and Drop Masking Policies
Masking policies can be altered or removed as needed.
Alter Masking Policy
ALTER TABLE MYPOLICIES.CUSTOMER
MODIFY COLUMN C_ACCTBAL
UNSET MASKING POLICY;
Drop Masking Policy
DROP MASKING POLICY customer_accbal2;
Important:
Always unset a masking policy from columns before dropping the policy.
Conclusion
Dynamic Data Masking in Snowflake provides a structured and flexible way to secure sensitive information at query time using role-based access. By applying masking policies to specific columns, organizations can control visibility without modifying the underlying stored data. The ability to view, alter, and manage these policies across schemas and tables ensures a controlled and auditable security framework for protecting sensitive data.