

How to Connect Amazon AWS S3 to Snowflake and Load Data: A Complete Beginner’s Guide
Connecting Amazon S3 with Snowflake is one of the most essential skills for any aspiring data engineer or Snowflake student. This integration forms the backbone of modern data pipelines where raw data lands in cloud storage and Snowflake acts as the analytical engine.
This guide walks you through the complete workflow: creating the S3 bucket, preparing Snowflake objects, setting up a storage integration, and capturing required AWS details. Each step also includes placeholders for screenshots to help you insert visuals later.
1. Introduction: Why Connect S3 and Snowflake
Amazon S3 is one of the most widely used cloud storage systems for landing raw data. Many organizations store logs, CSV files, JSON files, and external datasets in S3 before loading them into Snowflake.
Connecting S3 and Snowflake allows you to:
- Access data stored in S3 without manual downloads
- Run SQL queries over files using external stages
- Load structured data directly into Snowflake tables
- Build scalable, automated ingestion pipelines
This S3 ↔ Snowflake integration is foundational for batch pipelines, incremental ingestion, and ELT workflows used in real-world data engineering.
2. Step-1: Create S3 Bucket and Landing Folder
Before Snowflake can read data, you must prepare your S3 bucket structure.
Bucket Structure Overview
A standard ingestion bucket includes:
- A bucket (top-level container)
- A folder (often named landing/, raw/, or input/)
- One or more CSV files placed inside the landing folder
What You Will Do
- Create an S3 bucket.
- Create a folder inside it named
landing/. - Upload CSV files such as:
- Brazil_Customer.csv
- India_Customer.csv
- USA_Customer.csv
These files will be used later when testing the connection from Snowflake.
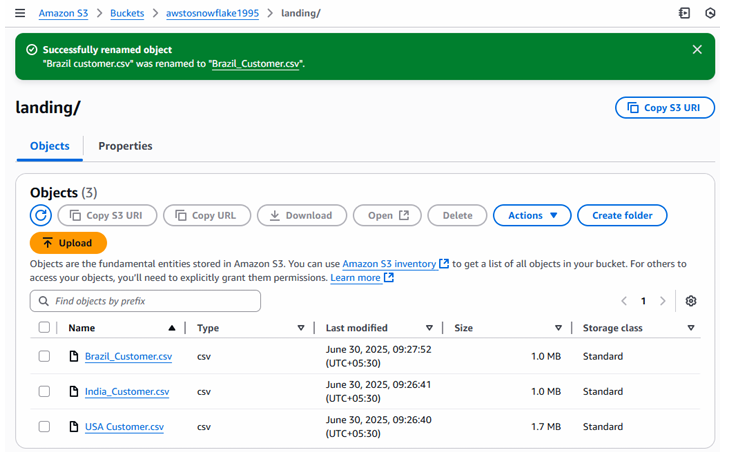
Fig: AWS S3 bucket and landing folder view
This corresponds to the visual shown in Step-1 where S3 items like file name, type, last modified, and size are displayed.
3. Step-2: Create Table and File Format in Snowflake
Now that the data is in S3, Snowflake needs matching structures to load the data properly.
3.1 Create the Customer Table
Below is the schema used in the workflow:
CREATE OR REPLACE TABLE CUSTOMER (
    C_CUSTKEY number,
    C_NAME varchar,
    C_ADDRESS varchar,
    C_NATIONKEY number,
    C_ACCTBAL number,
    C_MKTSEGMENT varchar,
    C_COMMENT varchar,
    load_date date
);
This table will store customer details after being loaded from S3.
3.2 Create CSV File Format
To load CSVs correctly, define a file format:
CREATE OR REPLACE FILE FORMAT CSVTYPE
TYPE='CSV'
SKIP_HEADER=1
FIELD_DELIMITER=','
RECORD_DELIMITER='\n'
FIELD_OPTIONALLY_ENCLOSED_BY='"'
DATE_FORMAT='DD-MMM-YYYY'
COMPRESSION = NONE;
This file format ensures Snowflake knows how to interpret CSV delimiters, headers, date formats, and quoting.
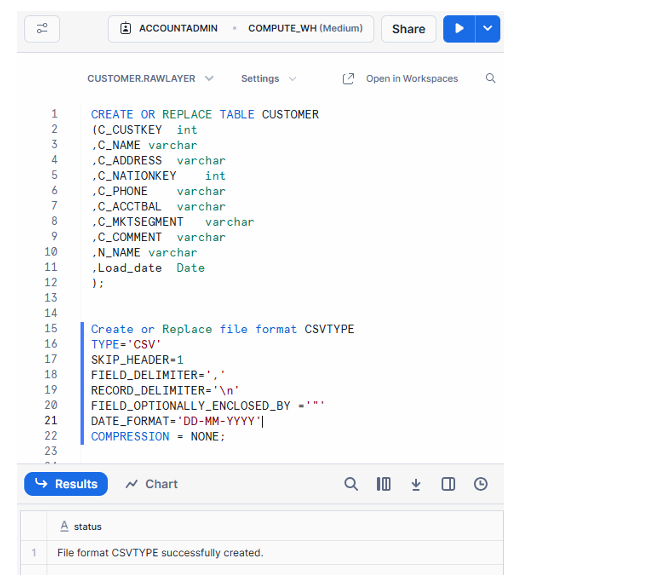
Fig : Snowflake worksheet with table & file format
This matches the worksheet shown in Step-2 where the table and file format were created.
4. Step-3: Create Storage Integration in Snowflake
Storage Integration is a secure Snowflake object that allows Snowflake to read from external storage without requiring you to store AWS keys inside Snowflake.
It provides:
- IAM role-based access
- Secure credential forwarding
- Governance of allowed S3 locations
4.1 What Is a Storage Integration?
A storage integration is Snowflake’s recommended method of authorizing Snowflake to access S3. Instead of access keys, Snowflake uses:
- An IAM role ARN
- A controlled list of allowed S3 URL paths
4.2 Create the Integration
Use this template inside Snowflake:
CREATE OR REPLACE STORAGE INTEGRATION AWS_INT
TYPE = EXTERNAL_STAGE
ENABLED = TRUE
STORAGE_PROVIDER = 'S3'
STORAGE_AWS_ROLE_ARN = '<your_role_arn>'
STORAGE_ALLOWED_LOCATIONS = ('<your_s3_url>');
What Do These Fields Mean?
- STORAGE_AWS_ROLE_ARN: The IAM role Snowflake will assume
- STORAGE_ALLOWED_LOCATIONS: A list of S3 paths Snowflake is allowed to read from
Both values will be retrieved in later steps.
This corresponds to Step-3 in the workflow where Snowflake prepares to connect to S3.
5. Step-4: Get the S3 Allowed Location URL
Snowflake requires an explicit allowed location so it does not gain access to the entire S3 bucket accidentally.
How to Obtain the Allowed Location
- Open your S3 bucket
- Navigate to the
landing/folder - Select any file
- Click Copy S3 URL
The URL will look something like:
s3://mybucket1995/landing/
This value needs to be pasted into the integration created earlier.
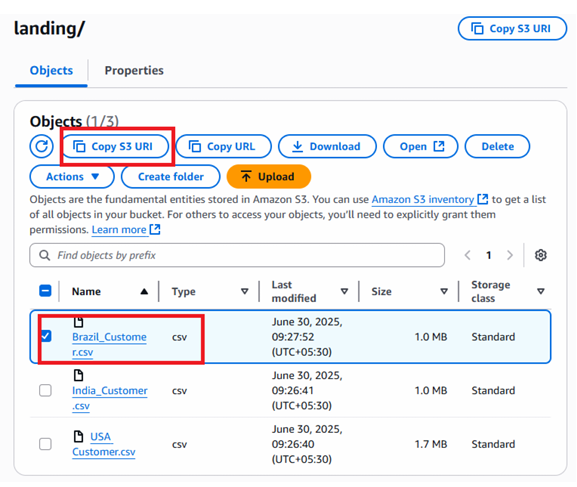
Fig : Allowed location copied from S3)
This matches the visual shown in Step-4 where the Copy S3 URL button is highlighted.
Conclusion
By completing these four steps, you have prepared all foundations required to establish a secure connection between Amazon S3 and Snowflake:
- You created an S3 bucket and uploaded sample CSV files
- You created a Snowflake table and CSV file format
- You set up a storage integration that allows Snowflake to access S3 securely
- You retrieved the S3 allowed location URL for integration configuration
These steps form the essential first half of a complete S3-to-Snowflake ingestion pipeline. In the next stages, you will finalize IAM roles, update trust policies, test the integration, and load data into Snowflake tables—fully automating your cloud data movement.