Snowpipe : Continuous Data Loading, Automated Ingestion and Event Notification Workflow
Snowpipe enables continuous, automated, serverless data loading into Snowflake as soon as new files land in cloud storage. This part covers the core concepts, architecture, workflow, differences from batch loading, and the first half of the practical implementation steps exactly as structured in the source.
This article covers the complete Snowpipe workflow in a structured sequence:
1. AWS S3 Event Notification Configuration
2. What is Continuous Loading
3. Snowpipe Architecture
4. Snowpipe vs Traditional Batch Loading
5. Practical Implementation of Snowpipe
What Is Continuous Loading?
Continuous loading refers to ingesting small volumes of data at frequent intervals—every few minutes or every hour. This supports real-time or near–real-time data ingestion and ensures that applications and analytical workloads always access the latest data available.
Key points:
- Loads small volumes of data in a continuous manner.
- Supports live or real-time data processing and ingestion.
- Ensures data warehouses always reflect the latest available information.
- Snowflake uses Snowpipe for continuous data ingestion into Snowflake tables.
Key Characteristics of Continuous Loading
- Continuous loading differs from traditional batch processing by enabling real-time ingestion.
- Traditional batch loads process large volumes at scheduled intervals, increasing latency.
- Continuous loading keeps data warehouses updated with minimal delay.
How Snowflake Implements Continuous Loading
Snowflake’s Snowpipe feature provides an automated, serverless ingestion system. When new data lands in cloud storage such as AWS S3, Azure Blob, or Google Cloud Storage, Snowpipe automatically triggers the data loading workflow without manual intervention. Snowpipe detects new files and begins ingestion immediately after they are staged.
Understanding Snowpipe
A Snowpipe is a named database object containing a COPY command responsible for loading data. Once configured, Snowpipe processes files within minutes of their arrival in the cloud stage.
Important characteristics:
- A pipe contains the COPY command used for ingestion.
- Snowpipe begins loading shortly after new files land in the stage.
- It uses compute resources provided by Snowflake—no warehouse management required.
- It is a serverless ingestion service.
- Setup is required only once.
- Recommended micro file size: 100–250 MB.
- Snowpipe uses file loading metadata to avoid reloading the same file if the filename has already been processed.
Understanding Snowpipe Architecture;
Snowpipe is Snowflake’s continuous data ingestion service that enables near real-time loading of data as soon as it’s available in cloud storage. Unlike traditional batch processing, Snowpipe provides an event-driven, serverless solution that automatically detects and processes new files without manual intervention.
How Snowpipe Works
The Snowpipe workflow consists of multiple stages from file arrival to ingestion completion.
Workflow Process Steps
- File Upload & Detection
- New files are uploaded to cloud storage (AWS S3, Azure Blob, or GCP Cloud Storage).
- Files are detected by the storage service.
- Event Notification Trigger
- Cloud storage sends an event notification (AWS S3 Event, Azure Event Grid, GCP Pub/Sub).
- This triggers Snowpipe to retrieve file arrival information.
- Snowpipe Activation
- Notification services activate the Snowpipe process.
- Snowpipe immediately starts processing new files using serverless compute.
- Metadata Validation
- Snowflake checks file loading metadata to identify whether the file was previously loaded.
- Prevents duplicate ingestion of identical filenames.
- Data Loading Execution
- The COPY command embedded in the pipe loads new data from the stage into Snowflake tables.
- Completion & Tracking
- Detailed metrics, logs, and error information are maintained.
- These are used for monitoring and troubleshooting ingestion.

snowpipe workflow diagram
Snowpipe vs Traditional Batch Loading
The comparison below highlights how Snowpipe differs from batch loading.
Comparison Table
| Aspect | Snowpipe | Traditional Batch Loading |
|---|---|---|
| Processing Time | Minutes after file arrival | Hours or days (scheduled) |
| Resource Management | Serverless, auto-managed | Requires dedicated warehouses |
| File Size Optimization | 100–250 MB micro-batches | Large files (GBs) |
| Cost Model | Pay per use (serverless credits) | Pay for warehouse uptime |
| Setup Complexity | One-time pipe creation | Requires scheduling and orchestration |
Best Practices for Snowpipe Implementation
- Optimize file sizes to 100–250 MB for best performance and cost efficiency.
- Use compressed file formats such as gzip to reduce storage cost and transfer time.
- Implement proper error handling and monitoring mechanisms for failed loads.
- Configure cloud storage event notifications for your platform.
- Use file naming conventions that support chronological processing.
- Monitor Snowpipe activity using
SYSTEM$PIPE_STATUS()functions. - Consider using multiple pipes for different data sources or tables.
- Implement data quality validations directly in COPY commands.
Practical Implementation
This section covers the first half of the step-by-step creation of Snowpipe, including integration setup, stage creation, and raw table creation.
Steps in Creating Snowpipe
- Create Storage Integration Object : Set up the storage integration to establish secure connection between Snowflake and external cloud storage.
- Create Stage Object Using Storage Integration : Define external stage that references the storage integration for accessing data files.
- Create a Raw Table to Load Data : Design and create the target table structure that will receive the incoming data.
- Create Snowpipe Using COPY Command : Configure the Snowpipe with COPY command to define how data should be loaded automatically.
- Create AWS S3 Event Notification Configuration : Set up S3 event notifications to trigger Snowpipe when new files are uploaded to the bucket.
Pre-Requisites Before Creating Snowpipe
Before creating SnowPipe you need to have databases , schema & file formats in place.
STEP-01: Create Database and Schema
CREATE DATABASE ecomproject;
CREATE SCHEMA ecomproject.sales;
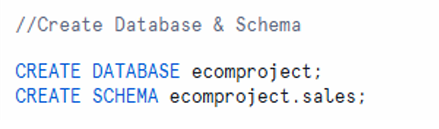
creation of database ecomproject and schema ecomproject.sales.
STEP-02: Create File Format
CREATE OR REPLACE FILE FORMAT csv_format_superstore
TYPE = 'CSV'
FIELD_DELIMITER = ','
SKIP_HEADER = 1
FIELD_OPTIONALLY_ENCLOSED_BY = ' " '
empty_field_as_null = TRUE
NULLIF = ('\\N', 'NULL', '')
ENCODING = 'UTF8';
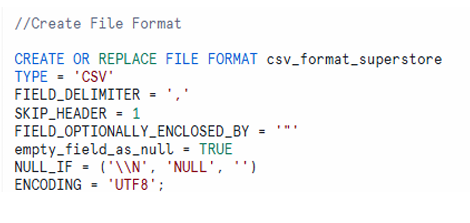
CSV file format creation with delimiter, header skip, null handling, and UTF8 encoding parameters
STEP-03: Connection between AWS S3 & Snowflake
Create Storage Integration Object
Storage integration connects Snowflake with AWS S3 securely.
Example for AWS S3:
CREATE OR REPLACE STORAGE INTEGRATION s3_integration
TYPE = EXTERNAL_STAGE
ENABLED = TRUE
STORAGE_PROVIDER = 'S3'
STORAGE_AWS_ROLE_ARN = 'arn:aws:iam::311410995815:role/aws_s3_snowflake_intg'
STORAGE_ALLOWED_LOCATIONS = ('s3://e-commerce-project-id-01/Bronze', 's3://e-commerce-project-id-01/silver', 's3://e-commerce-project-id-01/Gold/');

storage integration stores IAM credentials and enables secure access to external cloud storage
Explained here: https://techtown.in/snowflake/creating-an-iam-role-and-snowflake-storage-integration/
STEP-04: Create Stage Object Using Storage Integration
A stage specifies where files are stored before loading into Snowflake.
Creating External Stage
CREATE OR REPLACE STAGE external_stage
STORAGE_INTEGRATION = s3_integration
URL = 's3://ecomproject-s3-bucket/sales-data/superstore/'
FILE_FORMAT = csv_format_superstore;
Testing the Stage
LIST @external_stage;

stage creation referencing storage integration and listing stage contents
STEP-05: Create a Raw Table to load data from AWS S3 using SnowPipe
This table will store raw data from S3 via Snowpipe.
CREATE OR REPLACE TRANSIENT TABLE ecomproject.sales.superstore_orders_raw (
 Row_ID INT,
 Order_ID STRING,
 Order_Date DATE,
 Ship_Date DATE,
 Ship_Mode STRING,
 Customer_ID STRING,
 Customer_Name STRING,
 Segment STRING,
 Country STRING,
 City STRING,
 State STRING,
 Postal_Code STRING,
 Region STRING,
 Product_ID STRING,
 Category STRING,
 Sub_Category STRING,
 Product_Name STRING,
 Sales FLOAT,
 Quantity INT,
 Discount FLOAT,
 Profit FLOAT
);
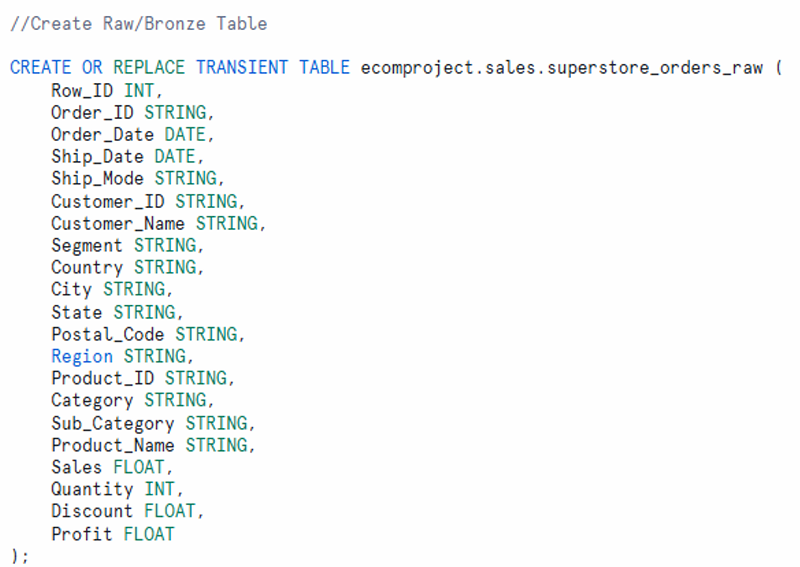
Complete raw table structure listing all columns needed for storing superstore order data
STEP-06: Create Snowpipe Using COPY Command
The pipe object contains the COPY statement used by Snowpipe for loading data. Once created, the pipe will automatically execute the COPY command whenever new files are detected in the specified stage.
The pipe object defines how Snowpipe loads data automatically.
CREATE OR REPLACE PIPE raw_sales_data_pipe
AUTO_INGEST = TRUE
AS
COPY INTO ecomproject.sales.superstore_orders_raw
FROM @external_stage
ON_ERROR = 'CONTINUE'
FILE_FORMAT = (FORMAT_NAME = 'csv_format_superstore');
AUTO_INGEST = TRUEenables automatic loading when S3 sends notifications.- The COPY command loads data into the raw table using the defined file format.
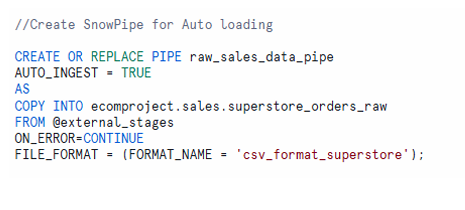
pipe creation and its role in executing COPY automatically upon event triggers
STEP-07 : AWS S3 Event Notification Configuration
A flow chart describes the AWS S3 event notification setup required to trigger Snowpipe automatically upon new file arrival.
The flow includes:
- Requesting SNS and SQS setup
- Creating notification rules
- Matching prefixes and file patterns
- Channel creation and mapping
- Generating ARNs for notification
- Completing configuration steps
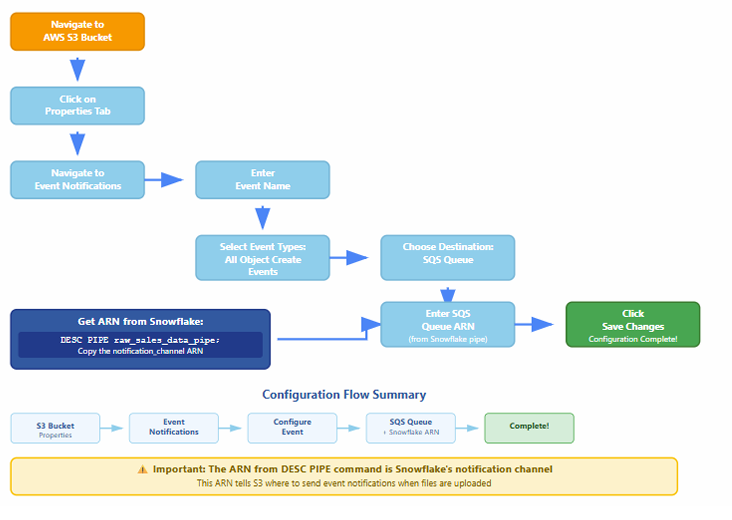
Flow diagram to create AWS S3 event notification configuration
Why Do We Need AWS Event Notification for Snowpipe?
Because Snowpipe doesn’t automatically know when a new file lands in your S3 bucket.
? So how does it know?
By using S3 Event Notifications, which trigger a message to an SNS or SQS topic, which Snowflake listens to.
What Happens Without It?
- You would need to manually call COPY INTO or a Snowpipe REST API to load data.
- No real-time or automated ingestion — not ideal for streaming-style data pipelines.
What AWS Event Notification Does:
- You upload a file (e.g., data_2025_07.csv) to your S3 bucket.
- S3 Event Notification is triggered.
- It sends a message to an SNS or SQS queue (configured to notify Snowpipe).
- Snowpipe receives the message and automatically loads the file into Snowflake using the defined file format and stage.
Event notifications enable Snowpipe to ingest files automatically. When a new file is uploaded to an S3 bucket, AWS generates an event and sends it to an SNS topic or SQS queue. Snowflake listens for these notifications and triggers the Snowpipe COPY command.
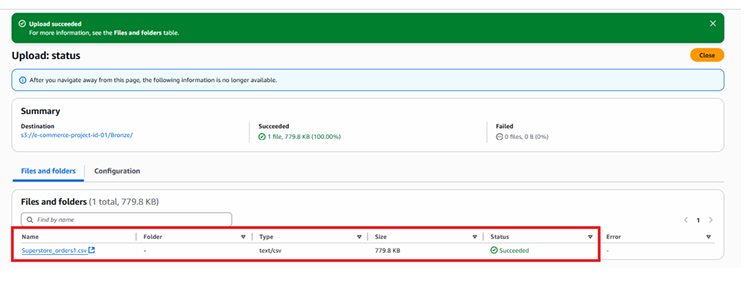
Testing Snowpipe
Testing – 1
Now load the file in S3 bucket and check whether the data is uploaded automatically by SnowPipe.
SELECT * FROM ecomproject.sales.superstore_orders_raw;
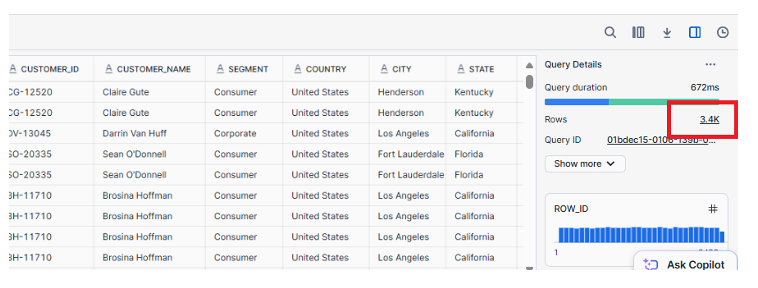
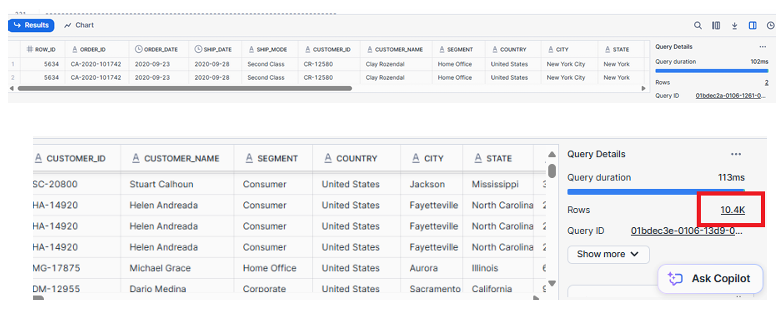
As observed, the table contains 3.4k records.
Testing – 2
Now load the second file in S3 bucket and check whether the data is uploaded automatically by SnowPipe.
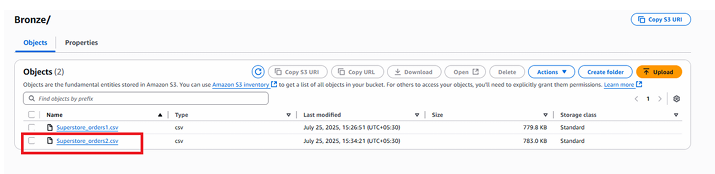
SELECT * FROM ecomproject.sales.superstore_orders_raw;
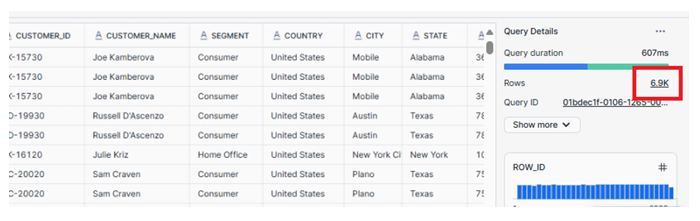
As shown above now we have 6.9k Records, so SnowPipe has automatically added records when we have uploaded second file in S3.
Important Point
Snowpipe avoids loading the same file more than once if the file name remains unchanged.
However, if the same data is uploaded using a different file name, Snowpipe treats it as a new file and loads it again. This behavior can result in duplicate records in the your table.

As shown below, Snowpipe has inserted duplicate records because the same data was uploaded using a different file name.