Tech Town >> SnowSQL: Data Load Errors and Export Data
SnowSQL: Handling Data Load Errors in Snowflake (ON_ERROR, FORCE and User Stage)
Introduction
Even with clean pipelines, data loads in Snowflake don’t always go as planned. Bad rows, column mismatches, duplicate loads, or repeated file processing can all cause COPY INTO to fail or behave unexpectedly.
SnowSQL gives you several powerful options to control how Snowflake reacts to errors, including:
ON_ERROR behavior
Column-count handling
Forcing reloads with FORCE=TRUE
Cleaning up staged files with PURGE=TRUE
In this guide, we’ll walk through these options step-by-step and see how they help you build more reliable data loading workflows.
1. Default Behavior: Partial Load with Errors
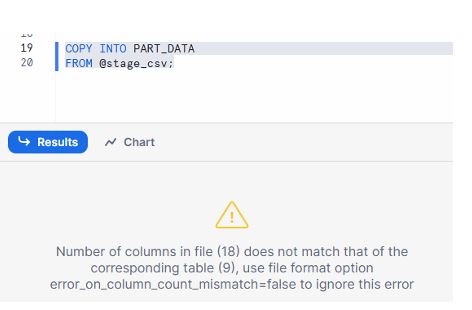
When you run a COPY INTO from a stage into a table, Snowflake validates each row against the target table definition.
If the number of columns in the file doesn’t match the table:
COPY INTO PART_DATA
FROM @stage_csv/EMP.csv;
By default:
The load fails for that file.
You’ll see an error indicating column count mismatch.
To relax this rule, you can use:
COPY INTO PART_DATA
FROM @stage_csv/EMP.csv
FILE_FORMAT = (ERROR_ON_COLUMN_COUNT_MISMATCH = FALSE);

This allows Snowflake to continue even if the file has more or fewer columns than expected (extra columns are ignored, missing ones become NULL).
Pro Tip: Use ERROR_ON_COLUMN_COUNT_MISMATCH = FALSE only when you’re sure extra columns are safe to ignore. Otherwise, fix the file structure.
2. Controlling Error Behavior with ON_ERROR
Snowflake’s ON_ERROR option lets you choose what happens when bad rows are encountered during COPY INTO.
From the PDF’s “Dealing With Errors” section, three main modes are highlighted:
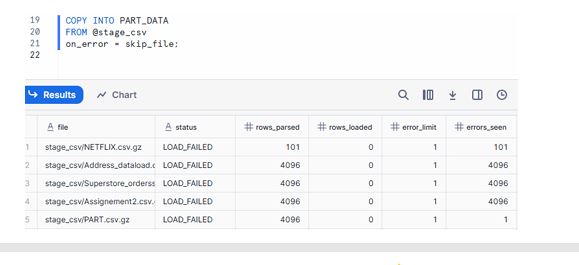
2.1 ON_ERROR = SKIP_FILE (Default for many cases)
Skips the entire file if any error occurs.
COPY INTO PART_DATA
FROM @stage_csv
ON_ERROR = SKIP_FILE;
Behavior:
If even one row in a file is bad, none of the rows from that file are loaded.
Safe when you prefer all-or-nothing per file.
Common Mistake: Assuming some rows from the file will still be loaded — with SKIP_FILE, they won’t.
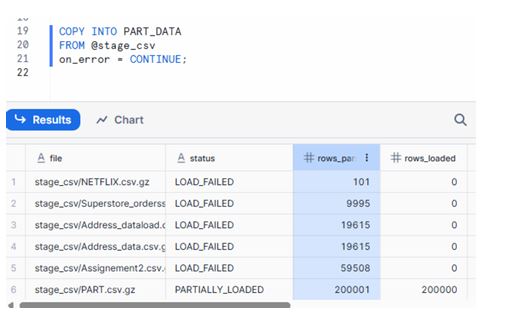
2.2 ON_ERROR = CONTINUE
Loads valid rows and silently skips the bad ones.
COPY INTO PART_DATA
FROM @stage_csv
ON_ERROR = CONTINUE;
Behavior:
Good rows are inserted.
Error rows are discarded.
Useful when partial data is acceptable, and you just want to get as much as possible into the table.
Pro Tip: Combine ON_ERROR = CONTINUE with a separate validation step so you can later inspect discarded records.
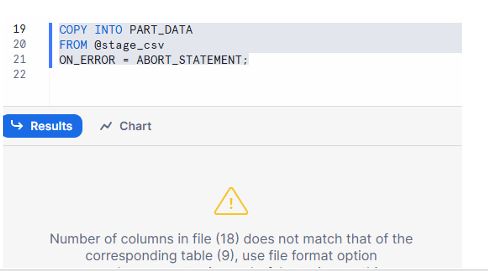
2.3 ON_ERROR = ABORT_STATEMENT
Stops the load on the first error.
COPY INTO PART_DATA
FROM @stage_csv
ON_ERROR = ABORT_STATEMENT;
Behavior:
As soon as Snowflake hits a bad row, the entire COPY INTO fails.
No data is loaded from that command.
This is ideal when you want strict guarantees that either everything loads cleanly or nothing is changed.
Best Practice: Use ABORT_STATEMENT in production loads where data correctness is more important than load completion.
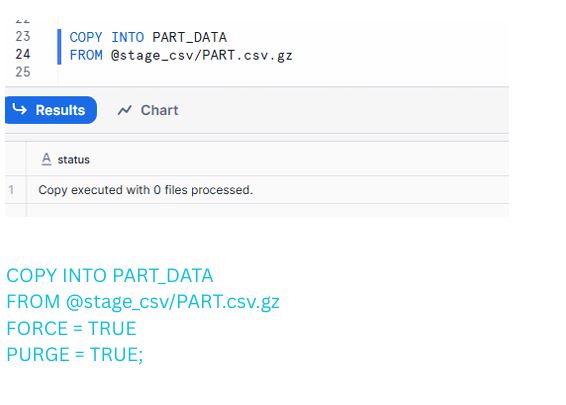
3. Understanding “0 Files Processed” and FORCE=TRUE
Sometimes, you rerun a COPY INTO using the same file from a stage and see this message:
0 files processed
This happens because Snowflake stores file load metadata for 64 days. If it detects that a file with the same name (and checksum) was already loaded, it skips it automatically.
To force Snowflake to process the file again, use FORCE=TRUE.
Example: Forcing a reload
COPY INTO PART_DATA
FROM @stage_csv/PART.csv.gz
FORCE = TRUE
PURGE = TRUE;
Here’s what each option does:
FORCE = TRUE
Ignores previous load history and reprocesses the file, even if Snowflake thinks it has already been loaded.
PURGE = TRUE
Deletes the source file from the stage after a successful load.
Helps keep your stage clean.
Pro Tip: Use FORCE = TRUE carefully. If your pipeline is not idempotent, forcing reloads may cause duplicate records unless handled at the table level.
4. When to Use FORCE vs OVERWRITE
The PDF includes a small table titled “When to Use What” explaining the difference between FORCE=TRUE and OVERWRITE=TRUE.
Here’s the idea in simple words:
Option
Direction
Use Case
Meaning
FORCE = TRUE
Stage ➜ Table
Loading from stage into table
Load the file again even if it was already processed
OVERWRITE = TRUE
Local ➜ Stage
Uploading to stage with PUT
Replace the existing file in the stage when uploading
Use OVERWRITE=TRUE when you are uploading a new version of the file via PUT.
Use FORCE=TRUE when you are loading a file from the stage into a table again.
Common Mistake: Mixing them up — OVERWRITE is about files in the stage, FORCE is about copying into tables.
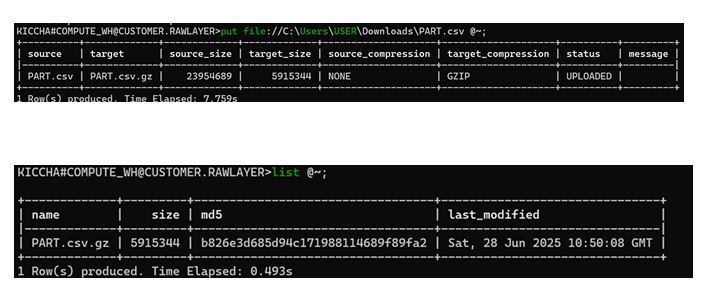
5. Loading Data into the User Stage (@~)
Apart from named stages like @stage_csv, Snowflake also gives every user a personal stage, referenced as @~.
PUT file://C:\Users\USER\Downloads\PART.csv @~;
What this does:
Uploads PART.csv into the current user’s stage.
Great for temporary testing, prototyping, or small personal experiments.
You can then run COPY INTO from @~ into any table you have access to.
Pro Tip: Use user stages for dev and POC work, and move to named stages for production pipelines.
Below is the insert-ready point you can place directly inside your article, specifically under the section:
“How to Copy Data from Table to Local Computer Using Snowflake Stages”
After that, I have also written the modified conclusion that matches your blog’s tone and flow.
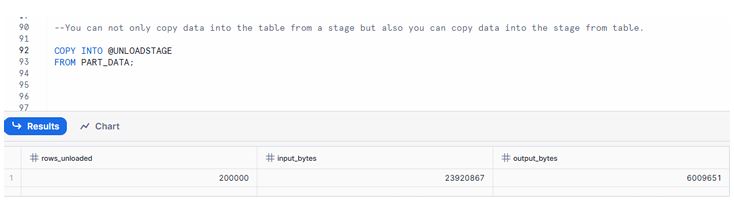
6. How to Copy Data from Table to Local Computer Using Snowflake Stages
6.1 Export Data from Table to Stage
How to Copy Data from Table to Local Computer Using Snowflake Stages 1. Export Data from Table to Stage
And the screenshot displays a COPY command exporting table data into a stage.
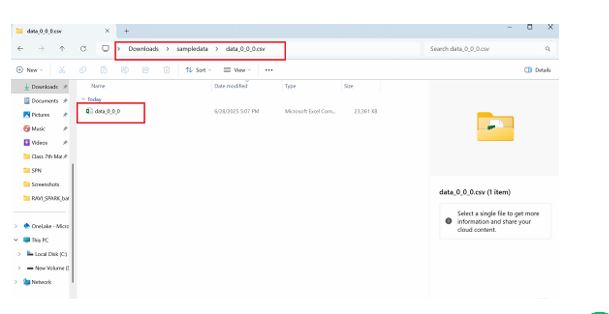
6.2 Download Data from Stage to Local Computer
Download Data from Stage to Local Computer
The below command downloads the file from the Snowflake stage (@unloadstage) to your local folder C:\Users\USER\Downloads\sampledata.
get @unloadstage file://C:\Users\USER\Downloads\sampledata;
The result below shows the file (data_0_0_0.csv.gz) was successfully downloaded to local machine.
You exported your table data from Snowflake to a stage, then downloaded it from the stage to your local machine
Note : PUT & GET are only 2 commands which will not work in UI
7. Quick Decision Guide
Here’s a short cheat sheet you can drop into your WordPress post:
Want to skip entire files with errors? → ON_ERROR = SKIP_FILE
Want to keep good rows, drop bad ones? → ON_ERROR = CONTINUE
Want all-or-nothing for the whole load? → ON_ERROR = ABORT_STATEMENT
Re-running a load from the same staged file? → Add FORCE = TRUE
Uploading a new version of the same file to stage? → Use OVERWRITE = TRUE in PUT
Need a quick place to upload files for testing? → Use user stage @~
This is why Snowflake always recommends the two-step pattern: COPY INTO stage → GET to local system instead of directly connecting and pulling data from tables.
Conclusion
Using SnowSQL to export and download Snowflake data gives you a clean, reliable, and automation-friendly workflow. Whether you’re delivering files to clients, performing offline analysis, or archiving processed results, this approach ensures:
Faster and stable exports
Safer downloads with retry capability
Proper handling of large datasets
Consistent structure for automation pipelines
Full control through Snowflake access roles
You exported your table data from Snowflake to a stage, then downloaded it fromthe stage to your local machine.
Note : PUT & GET are only 2 commands which will not work in UI
With staging-based exports and the GET command, you now have everything needed to move processed data out of Snowflake efficiently — completing the full cycle of Load → Transform → Export → Deliver inside your data workflow.