

A complete walkthrough for validating Azure-to-Snowflake integration and ingesting data using stages.
Once permissions, consent, and identity mappings are configured between Azure ADLS and Snowflake, the next phase is operationalizing the integration. This involves creating an external stage, confirming access to ADLS files, and loading data into Snowflake tables using the COPY INTO command. These steps form the practical bridge between cloud storage and analytical workloads.
Step 1: Create a Stage Object and Verify It
An external stage in Snowflake acts as a pointer to an ADLS location. It contains:
- Database name
- Schema name
- File format definition
- Storage integration object
- Allowed location URL (must begin with
azure://)
Example Stage Creation
CREATE OR REPLACE STAGE Customer.external_stages.stg_azure_cont
STORAGE_INTEGRATION = snow_azure_int
URL = 'azure://<storageaccount>.blob.core.windows.net/<container>/landing/'
FILE_FORMAT = Customer.Rawlayer.csv_fileformat;
This command registers the ADLS path as an external stage that Snowflake can reference for loading or listing data.
Create stage object by providing database name , schema name, storage_allowed_location URL, storage_integration and file format
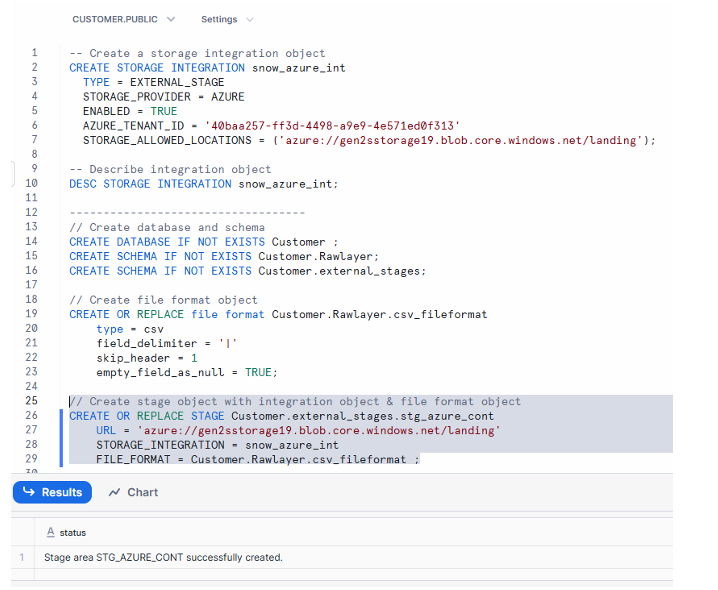
Execution of CREATE OR REPLACE STAGE completing successfully, showing the azure:// location, storage integration reference, and confirmation message in Snowflake worksheet.
Step 2: Verify the Integration by Listing Files
After creating the stage, the next step is confirming that Snowflake can see the ADLS files. This ensures the integration, permissions, and connection configuration are functioning correctly.
Command to Run
LIST @Customer.external_stages.stg_azure_cont;
This displays:
- File paths
- File sizes
- Last modified timestamps
- Load status indicators
A successful listing means Snowflake has authenticated properly and can browse your ADLS container.

Output showing file names inside ADLS with status LOADED, indicating Snowflake was able to retrieve metadata from the stage.
Now we can conclude that our storage integration between Azure & Snowflake was successful.
Step 3: Load ADLS Data into a Snowflake Table
Once the files are visible from Snowflake, data can be ingested into a structured table using the COPY INTO command.
Table Creation Example
CREATE OR REPLACE TABLE Customer.Rawlayer.customer_data (
    ID NUMBER,
    Name STRING,
    Address STRING,
    PhoneNo STRING,
    Joiningdate STRING,
    Runby STRING
);
COPY INTO Command
COPY INTO Customer.Rawlayer.customer_data
FROM @Customer.external_stages.stg_azure_cont
FILE_FORMAT = (TYPE = 'CSV' ERROR_ON_COLUMN_COUNT_MISMATCH = FALSE);
This command loads all files from the stage into the table while handling variations in column counts if mismatches occur.
Once loaded, queries on customer_data will display the new rows.
Now we have to load file into table using copy into command from the stage object we have created.
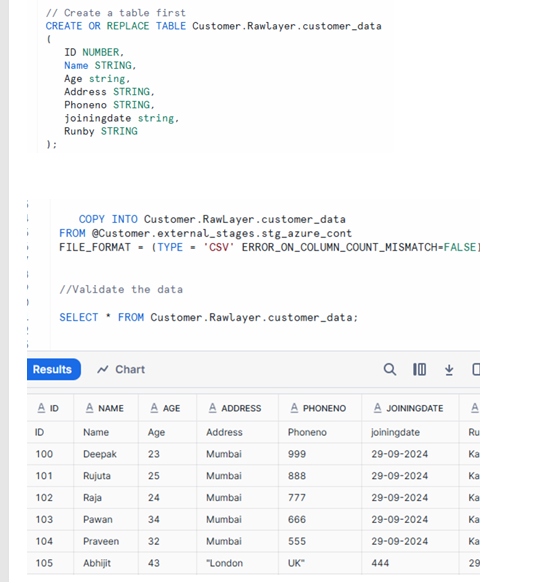
Rows of ID, Name, Address, PhoneNo, Joiningdate, and Runby displayed in Snowflake query results, confirming successful ingestion using COPY INTO.
Step 4: Flowchart Overview of All Steps
The flowchart provides a consolidated visual of the complete Azure ADLS to Snowflake integration workflow:
- Azure ADLS
- Retrieve Tenant ID
- Retrieve Storage Container URL
- Create Storage Integration
- Provide Consent
- Assign IAM Roles
- Create Stage in Snowflake
- Load Data into Table
This sequence shows how identity, permissions, and ingestion operations connect into one continuous process.
Image Description (Page 13)
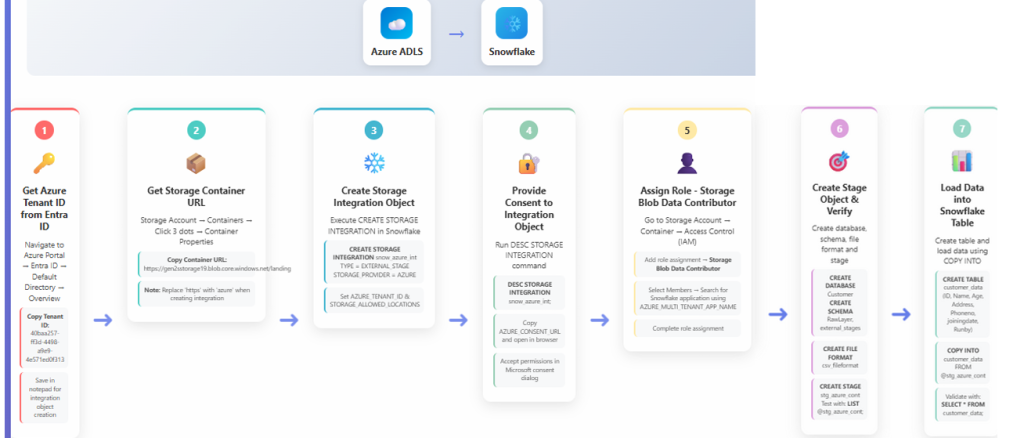
Full flow diagram illustrating Azure prerequisites, integration creation, consent flow, IAM role assignment, stage creation, and final table load sequence.
Summary
This guide covered the operational steps required to work with ADLS data inside Snowflake:
- Creating an external stage that points to an ADLS location
- Verifying access by listing stage contents
- Loading ADLS files directly into Snowflake tables
- Reviewing the end-to-end workflow via a flowchart
Together, these steps transform the Azure–Snowflake integration into a functional ingestion pipeline, allowing cloud-stored files to be efficiently loaded and used for analytical workloads.