

Flattening JSON in Snowflake: Complete Step-by-Step Guide
Flattening JSON enables converting nested and complex hierarchical data into a simple relational structure of rows and columns. This allows easier analysis, querying, and extraction of deeply embedded values using SQL. This guide walks through all steps required to flatten a JSON file in Snowflake, from initial setup to generating the final flattened table.
The JSON File Used for Flattening
The JSON file contains multiple records, each representing a person with attributes such as Name, Gender, Date of Birth, Address, Skills, Work, and Mobile. The structure includes nested objects such as Address and arrays such as Skills.
{
 "Name": "Anil Kumar",
 "Gender": "Male",
 "DOB": "1996-10-01",
 "Skills": [
   "Pyspark",
   "Databricks",
   "Snowflake"
 ],
 "Address": {
   "House Number": "123",
   "City": "Hyderabad",
   "State": "Telangana"
 },
 "Work": 96757,
 "Mobile": 12367498
},
{
 "Name": "Priya Sharma",
 "Gender": "Female",
 "DOB": "1992-07-01",
 "Skills": [
   "AIDP",
   "Pega"
 ],
 "Address": {
   "House Number": "45-B",
   "City": "Bangalore",
   "State": "Karnataka"
 },
 "Work": 9154578,
 "Mobile": 25167905
}
[Image Description: Visual representation of the JSON file showing two person records with nested Address objects and Skills arrays.]
Why to Flatten JSON File?
Flattening JSON provides several advantages:
- It makes nested and complex data easier to read and process, especially in tools like SQL or Excel.
- It helps convert hierarchical (tree-like) JSON into a simple table format.
- It becomes easier to analyze, filter, and query values stored deep inside the JSON.
Prerequisites:
- Connect Amazon S3 with Snowflake. [https://techtown.in/snowflake/connect-aws-s3-to-snowflake/]
- Load the JSON file into an Amazon S3 bucket. [https://techtown.in/snowflake/load-data-from-aws-s3-to-snowflake/]
Step-by-Step Explanation
Below are all steps required to flatten JSON data in Snowflake, including schema creation, staging, loading, and flattening.
Step-01: Creating Required Schemas
CREATE OR REPLACE SCHEMA BOOTCAMP.external_stages;
CREATE OR REPLACE SCHEMA BOOTCAMP.STAGE_TBLS;
CREATE OR REPLACE SCHEMA BOOTCAMP.INTG_TBLS;
Explanation
external_stages– used for external staging areas (e.g., S3).STAGE_TBLS– used for raw staging tables.INTG_TBLS– used for integrated or final processed tables.
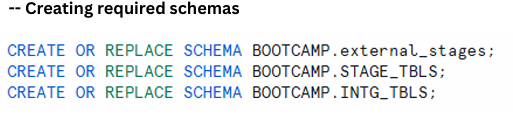
creation of three schemas designed for external stages, raw tables, and final integrated tables.
Step-02: Creating JSON File Format
CREATE OR REPLACE FILE FORMAT BOOTCAMP.file_formats.FILE_FORMAT_JSON
TYPE = JSON
STRIP_OUTER_ARRAY = TRUE;
Explanation
- When JSON files contain arrays,
STRIP_OUTER_ARRAY = TRUEensures each element becomes an individual row. - This is essential when flattening arrays such as Skills.

panel describing file format details and purpose of STRIP_OUTER_ARRAY
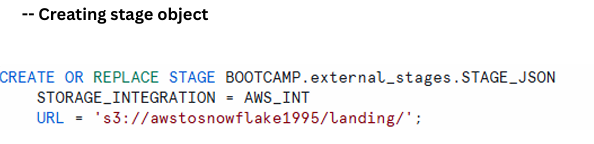
Step-03: Creating the Stage Object
CREATE OR REPLACE STAGE BOOTCAMP.external_stages.STAGE_JSON
STORAGE_INTEGRATION = AWS_INT
URL = 's3://awstosnowflake1995/landing/';
Explanation
Purpose:
Creates or replaces a stage in Snowflake called STAGE_JSON.
Location:
Stored under the schema BOOTCAMP.external_stages.
STORAGE_INTEGRATION:
Uses a predefined integration AWS_INT that securely connects Snowflake to Amazon S3.
URL = ‘s3://awstosnowflake1995/landing/’;
Points to the S3 folder where the JSON files exist.
In short, this builds a secure connection that lets Snowflake load or unload data from S3.
Object creation description showing purpose, location, integration details, and S3 path.
Listing Files in the Stage
LIST @BOOTCAMP.external_stages.STAGE_JSON;
This command displays all files available in the connected S3 bucket.
The JSON file contacts_data.json appears in the listing.
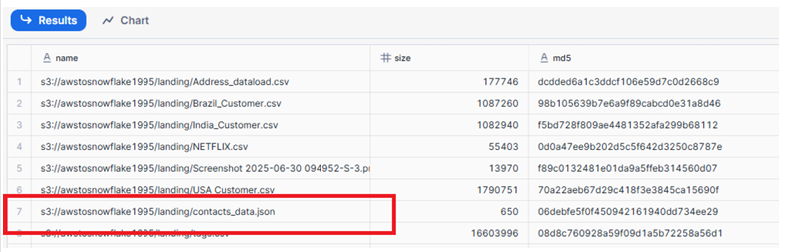
File list showing JSON files stored in the landing folder of the S3 bucket.
Step-04: Creating Stage Table to Store Raw Data
CREATE OR REPLACE TABLE BOOTCAMP.STAGE_TBLS.contact_data_JSON_RAW
(raw_file variant);
Explanation
- Creates a table named
contact_data_JSON_RAW. - Contains a single column
raw_fileof type VARIANT. - VARIANT stores semi-structured data (JSON, Avro, XML).
This holds raw JSON exactly as loaded before parsing.

raw table creation and VARIANT column usage
Step-05: Copy Raw Data into the Stage Table
COPY INTO BOOTCAMP.STAGE_TBLS.contact_data_JSON_RAW
FROM @BOOTCAMP.external_stages.STAGE_JSON
file_format= BOOTCAMP.file_formats.FILE_FORMAT_JSON
FILES=('contacts_data.json');
Explanation
- Loads the file
contacts_data.jsonfrom S3 into the raw table. - Specifies the external stage as the source.
- Uses JSON file format settings.
- Imports only the specified file.
This loads raw JSON rows directly into Snowflake.

Panel explaining purpose, source, file format usage, and behavior of the COPY INTO process
View Raw Table Data
SELECT * FROM BOOTCAMP.STAGE_TBLS.contact_data_JSON_RAW;

Table displaying JSON rows stored inside the raw_file column
Step-06: Flatten JSON into the Final Table
CREATE OR REPLACE TABLE BOOTCAMP.INTG_TBLS.contact_data AS
SELECT
 raw_file:Name::string as Name,
 raw_file:Gender::string as Gender,
 raw_file:DOB::date as DOB,
 f1.value::string as Skill,
 raw_file:Address."House Number"::string as House_No,
 raw_file:Address.City::string as City,
 raw_file:Address.State::string as State,
 raw_file:Phone.Work::number as Work_Phone,
 raw_file:Phone.Mobile::number as Mobile_Phone
FROM BOOTCAMP.STAGE_TBLS.contact_data_JSON_RAW,
     table(flatten(raw_file:Skills)) f1;
Explanation
What it does:
- Creates a new table
contact_datainsideINTG_TBLS. - Reads raw JSON and extracts fields such as Name, Gender, DOB, Address details, and Phone numbers.
- Uses
flatten(raw_file:Skills)to extract each skill as its own row.
How it works:
flattenexpands each skill value for every user.value::stringretrieves the text representation of each skill.- All selected fields are assigned readable column names.

Section illustrating field extraction, flattening logic, and final table creation.
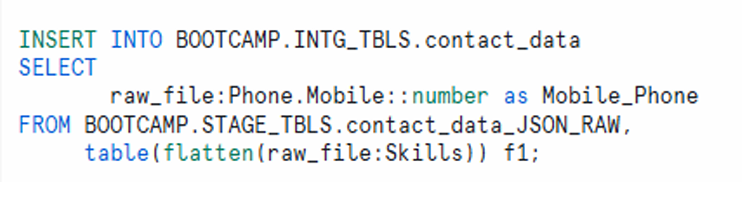
Step-07: Insert New Flattened Data into the Existing Table
INSERT INTO BOOTCAMP.INTG_TBLS.contact_data
SELECT
 raw_file:Phone.Mobile::number as Mobile_Phone
FROM BOOTCAMP.STAGE_TBLS.contact_data_JSON_RAW,
     table(flatten(raw_file:Skills)) f1;
Explanation
What it does:
- Inserts parsed and flattened records into the existing
contact_datatable.
How it works:
- Same logic as table creation, but used when appending new data.
- Ensures each skill becomes a separate row.
Note: Only use this for incremental loads and ensure no duplicate source files are inserted.
Insert New Flattened Data into the Existing Table
Viewing Final Flattened Data
SELECT * from BOOTCAMP.INTG_TBLS.contact_data;
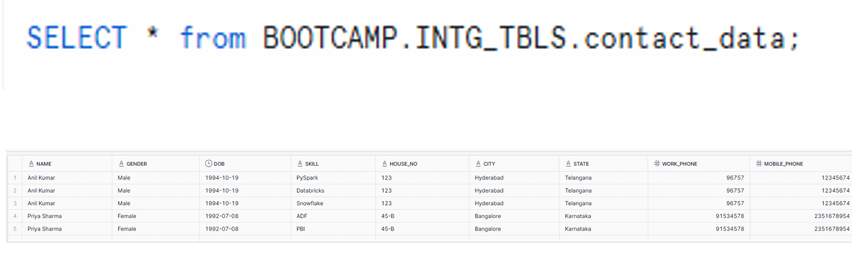
Table showing fully flattened data with Name, Gender, DOB, Skill, Address fields, and Phone numbers
Re-start from Beginning (Cleanup Commands)
DROP SCHEMA INTG_TBLS;
DROP SCHEMA STAGE_TBLS;
DROP STAGE BOOTCAMP.STAGE_TBLS.contact_data_JSON_RAW;
These commands remove all objects created during the flattening process.
Summary of Steps: Flattening JSON in Snowflake
- Create required schemas
Logical organization for your objects. - Create a JSON file format
UseSTRIP_OUTER_ARRAY = TRUEso each item in an array becomes a row. - Create a stage object
Link your S3 bucket to Snowflake. - Create a raw stage table
A table with a VARIANT column to store raw JSON data. - Copy JSON data into the raw stage table
Load your JSON from S3 into Snowflake using the correct file format. - Flatten and parse JSON into the final table
Useflatten(raw_file:Skills)so each skill appears as a separate row per person. - INSERT INTO (Incremental loads)
Append new data using INSERT statements while avoiding duplicate inserts.