

Creating an IAM Role and Setting Up Snowflake Storage Integration (Complete Guide)
Connecting Snowflake to Amazon S3 securely requires setting up a Storage Integration in Snowflake and a matching IAM Role in AWS. This combination ensures Snowflake can access S3 without storing access keys, following industry-standard security practices.
This article walks through every required step—creating an IAM Role, configuring permissions, extracting required ARNs, updating trust policies, and validating the integration. Each step includes detailed descriptions of what your screenshot should show so you can paste images exactly where needed.
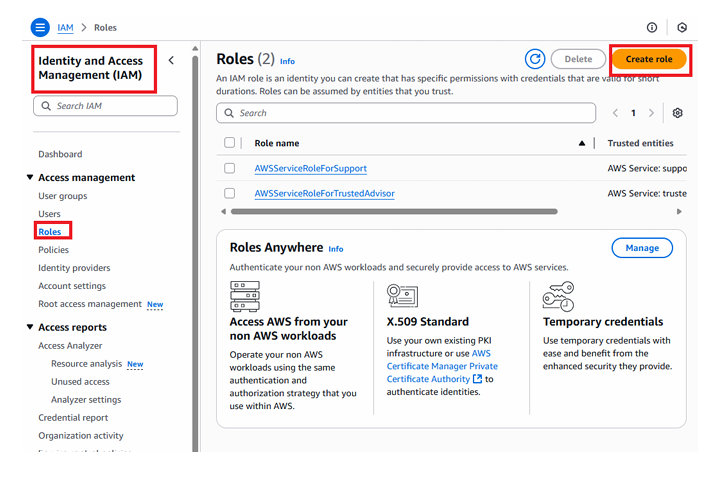
1. Step-1: Create IAM Role in AWS (IAM → Roles → Create Role)
To allow Snowflake to read from S3, you must create an IAM role that Snowflake can assume.
Process Overview
- Open AWS Console → Go to IAM
- Navigate to Roles
- Click Create Role
- Choose AWS Account as the trusted entity
- Select “Another AWS account”
- Enter an External ID (any unique value)
Screenshot showing the IAM Create Role wizard: “AWS Account” selected as Trusted Entity Type, “Another AWS account” chosen, External ID field highlighted, and the Next button visible.
Select AWS account ⟶ Select account⟶ click on options ⟶ Provide External ID(you can provide any number) – > click on Next
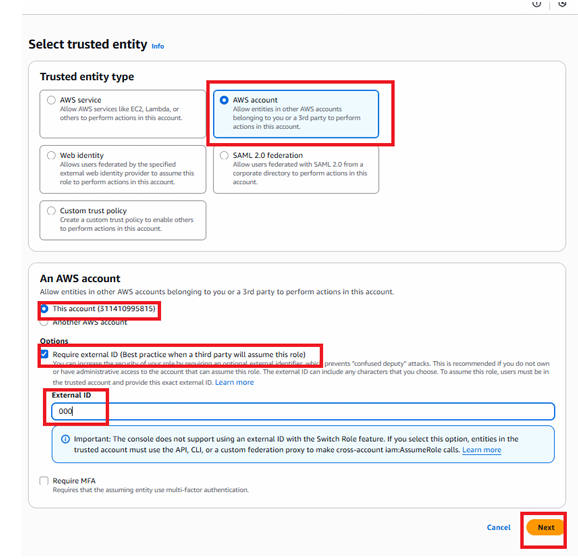
This External ID will later be verified and used in Snowflake.
2. Step-2: Attach Permissions to the IAM Role
After selecting the trusted entity, the next step is assigning the correct permissions.
Process Overview
- Choose access type (usually S3-related permissions required for Snowflake to read the files).
- Continue by clicking Next.
Select type of access ⟶ Click NEXT
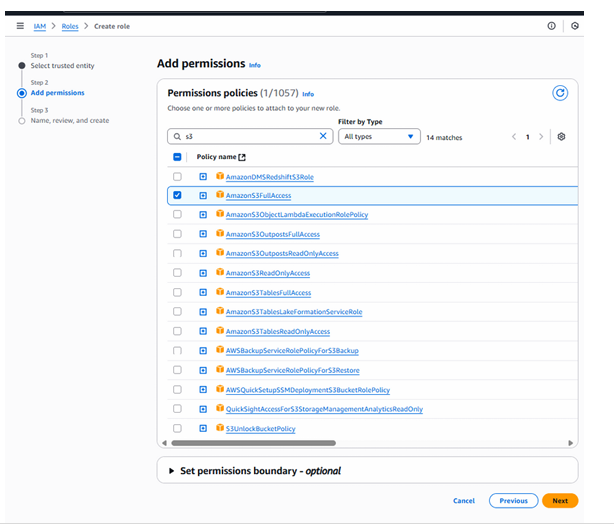
Screenshot showing the “Add permissions” page inside IAM Role creation, with multiple AmazonS3 permissions listed and the Next button shown on the bottom right.
This screen confirms the policy you are attaching to the role.
3. Step-3: Name the Role and Create It
Once permissions are chosen, finalize the role by giving it a clear, descriptive name.
Process Overview
- Provide a role name (ex:
snowflake_s3_access_role) - Review configuration details
- Click Create Role
Provide role name⟶ Click on create role

Screenshot showing the Role Name field filled in, the review page listing trusted entity, permission policy, and a “Create Role” button highlighted.
The IAM Role is now created and ready to be connected to Snowflake.
Click on role
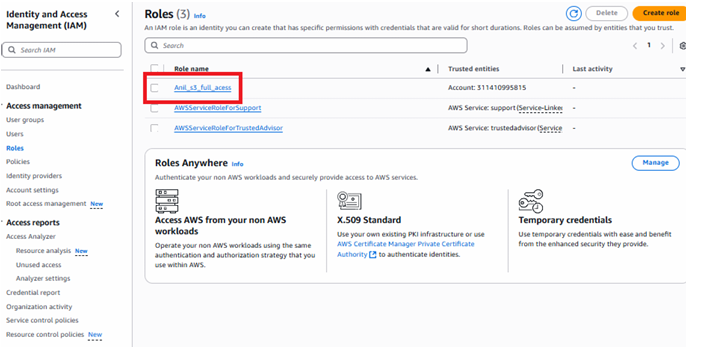
Selecting the role
4. Step-4: Copy the Role ARN and Paste It Into Snowflake Storage Integration
Snowflake requires the role’s ARN to assume it securely.
Process Overview
- Open the newly created IAM Role
- Copy the Role ARN shown at the top
- Paste it into the Snowflake
STORAGE_INTEGRATIONcommand
Example Snowflake code:
CREATE OR REPLACE STORAGE INTEGRATION AWS_INT
TYPE = EXTERNAL_STAGE
ENABLED = TRUE
STORAGE_PROVIDER = 'S3'
STORAGE_AWS_ROLE_ARN = '<paste_your_arn_here>'
STORAGE_ALLOWED_LOCATIONS = ('s3://your-bucket/landing/');
Copy ARN and provide this in Storage integration code
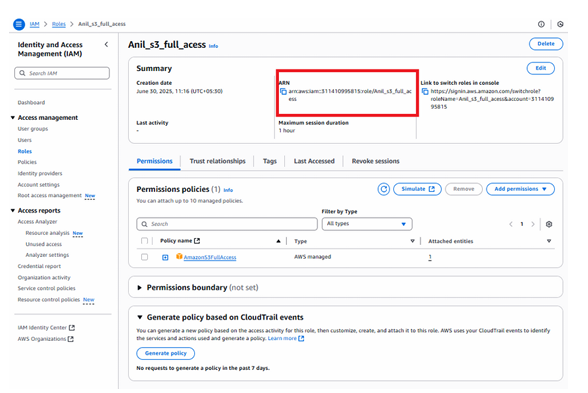
Screenshot showing the IAM role details page with the Role ARN prominently highlighted, demonstrating where to copy it from before pasting into Snowflake.
Now Execute the code in Snowflake in snowflake:
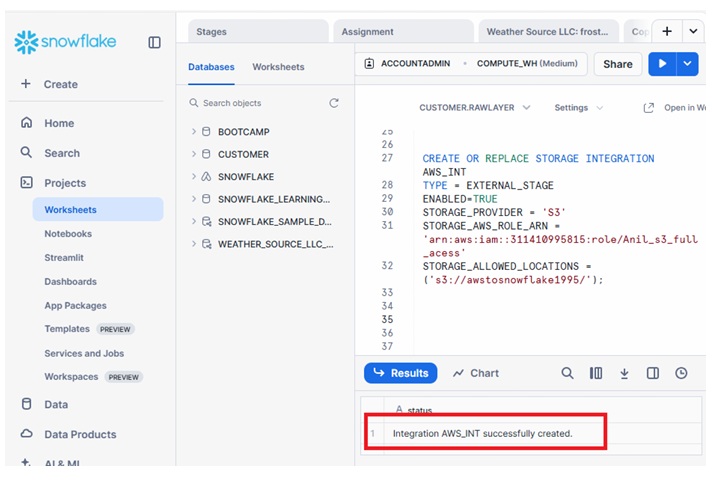
Integration successful with AWS
If you want to copy all the files in a bucket then in above code remove folder name & file name in storage_allowed_location
5. Step-5: DESCRIBE the Storage Integration in Snowflake
After creating the integration, Snowflake provides key values required to update the AWS role trust policy.
Commands to Run in Snowflake
DESCRIBE INTEGRATION AWS_INT;
Look for:
- property 5: STORAGE_AWS_IAM_USER_ARN
- property 7: STORAGE_AWS_EXTERNAL_ID
These two values must be added to your AWS trust policy.
Now execute Describe command & copy line 5 & 7 property value
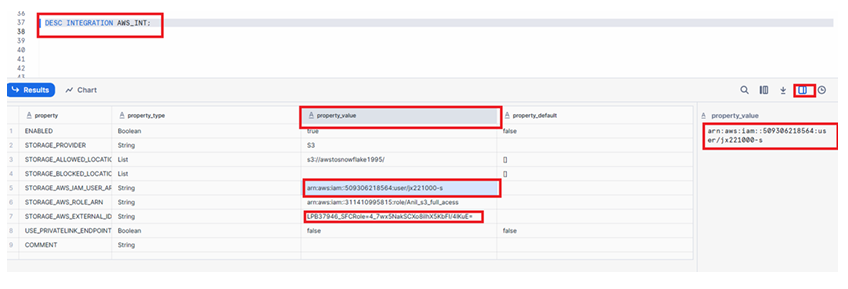
Screenshot showing the DESCRIBE INTEGRATION output with columns like property, property_value, and line numbers, highlighting line 5 and 7 property values that need to be copied.
These values confirm how Snowflake identifies itself when assuming your IAM Role.
6. Step-6: Update AWS Trust Policy Using Snowflake Values
To finalize the connection, AWS must trust Snowflake using the ARN and External ID from the previous step.
Process Overview
- In AWS Console → IAM → Roles
- Open the role created earlier
- Go to Trust relationships
- Click Edit trust policy
- Replace the placeholder values with:
AWS_IAM_USER_ARNAWS_EXTERNAL_ID
Go to IAM ⟶ Roles ⟶ Click on Role which you have created ⟶ Trust Relationhips ⟶ Click on Edit trust policy
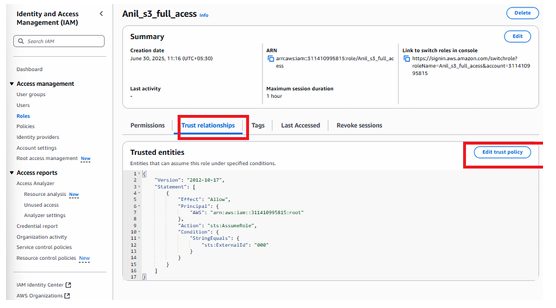
Screenshot showing the IAM trust relationship editor: Snowflake’s IAM user ARN added in the “Principal” field, and the External ID added under “Condition → StringEquals”, followed by a green confirmation banner “Edit Trust Policy”.
Update AWS ARN & External ID values which you have copied in previous and click on update policy.
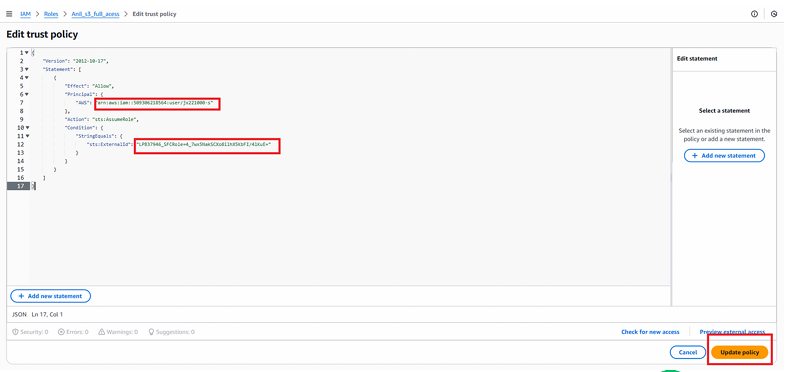
click on update policy and authorize the final step of connection.
This establishes a secure, fully authorized connection between S3 and Snowflake.
7. Summary: Snowflake ↔ AWS S3 Connection Successfully Configured
After completing these steps, your integration is fully operational:
- The IAM Role is created
- The role has the correct S3 permissions
- Snowflake Storage Integration is configured
- The IAM trust policy now trusts Snowflake
- Key ARNs and External IDs match correctly
Your S3 data is now ready to be accessed through Snowflake using external stages, secure copying, and automated ingestion workflows.
Using this foundation, you can now perform actions such as:
- Listing S3 files using
LIST @your_stage; - Querying raw files directly
- Copying data into Snowflake tables
- Setting up ingestion pipelines for production data engineering
This completes the secure authentication setup between AWS S3 and Snowflake, ensuring full control, auditability, and least-privilege access.