

Snowflake Tasks: Scheduling, Dependencies, and Automation
What Is a Task?
We use tasks for scheduling in Snowflake.
Using tasks, we can schedule:
- SQL queries
- Stored procedures
Tasks can be combined with streams for implementing the continuous change data captures (CDC).
We can maintain a DAG of tasks to keep the dependencies between tasks.
Tasks require compute resources to execute SQL code. We can choose either of the following:
- Snowflake managed compute resources (Serverless)
- User managed (Virtual warehouses)
IMPORTANT NOTE
When we create a task, it will be in a suspended state, so we need to resume it by:
ALTER TASK emp_task RESUME;
This step is mandatory to start task execution.
How to Create a Task?
By using the CREATE TASK command, we can create tasks.
CREATE OR REPLACE TASK task_name
WAREHOUSE = 'warehouse_name'
SCHEDULE = 'Time or cron'
AS
SQL statement;
The SQL statement can be either:
- A query
- A call to a stored procedure
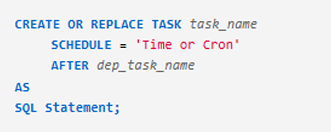
CREATE TASK with warehouse, schedule, and SQL statement
Altering a Task
By using the ALTER TASK command, you can:
- Add or remove dependency
- Change the warehouse
- Change the schedule
- Modify the SQL statement
- Add, remove, or modify comments
- Suspend or resume tasks
Examples
ALTER TASK task_dept ADD AFTER task_emp;
ALTER TASK task_dept REMOVE AFTER task_emp;
ALTER TASK emp_task SET SCHEDULE = '5 minutes';
ALTER TASK emp_task SUSPEND;
IMPORTANT NOTE
When we create a task, it will be in a suspended state, so we need to resume it by day.
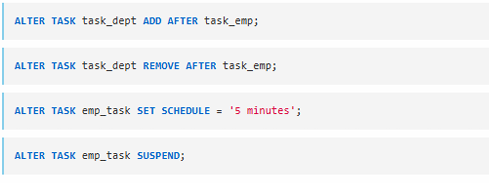
ALTER TASK operations with SQL examples
Sample Tasks
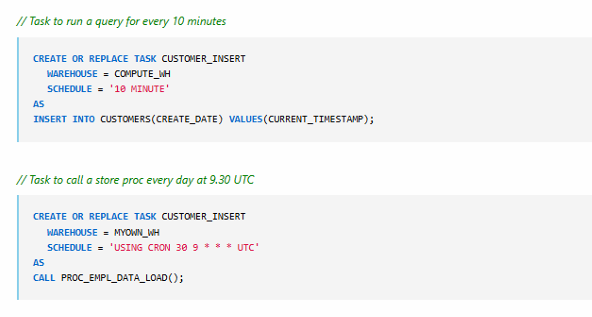
Task to Run Every Five Minutes
CREATE OR REPLACE TASK CUSTOMER_INSERT
WAREHOUSE = COMPUTE_WH
SCHEDULE = '5 MINUTE'
AS
INSERT INTO CUSTOMERS (CREATE_DATE)
VALUES (CURRENT_TIMESTAMP);
Task to Call a Stored Procedure Once per Day at 9:30 UTC
CREATE OR REPLACE TASK CUSTOMER_INSERT
WAREHOUSE = COMPUTE_WH
SCHEDULE = 'USING CRON 30 9 * * * UTC'
AS
CALL PROC_LOAD_DATA();
Using Cron
Cron expressions allow scheduling tasks at specific times or intervals.
Cron Fields
- Minute (0–59)
- Hour (0–23)
- Day of month (1–31 or *)
- Month (1–12 or *)
- Day of week (0–6 or *)
- Time zone (UTC)
Schedule Value Examples
| SCHEDULE Value | Description |
|---|---|
* * * * * UTC | Every minute, UTC time zone |
0 2 * * * UTC | Every night at 2 AM, UTC |
0 5,17 * * * UTC | Twice daily at 5 AM and 5 PM |
30 2 L 6 * UTC | At 2:30 AM on the last day of June |
Table : mapping cron expressions to execution descriptions
What Is Cron?
Cron is a time-based job scheduler in Unix-like operating systems.
In Snowflake, we use cron syntax to schedule tasks to run automatically at specific times or intervals.
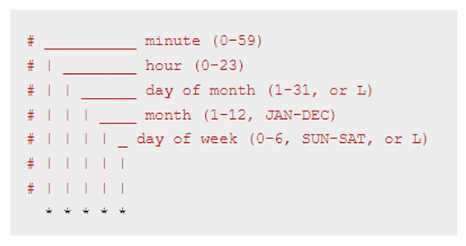
Cron Expression Structure
A cron expression consists of five time fields, followed by the time zone (for example, UTC).
Each field can be:
- An exact value (for example,
2) - A wildcard (
*means “every”) - A list (for example,
5,17) - Special values like
L(last day)
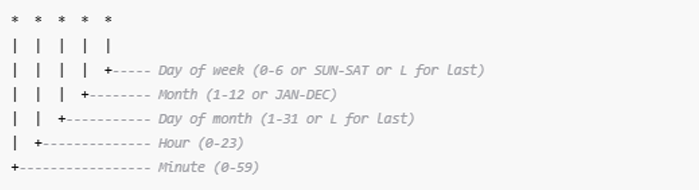
Cron structure including minute, hour, day, month, weekday, and timezone
Example Cron Schedules
| SCHEDULE Value | Description |
| * * * * * UTC | Every minute. |
| 0 2 * * * UTC | Every night at 2 AM. |
| 0 5,17 * * * UTC | Twice daily at 5 AM and 5 PM. |
| 30 2 L * 6 UTC | At 2:30 AM on the last day of June. |
How to Read a Cron Expression
Let’s break down one example:
0 2 * * * UTC
0→ At minute 02→ At hour 2 (2 AM)*→ Every day of the month*→ Every month*→ Every day of the weekUTC→ UTC time zone
This schedule triggers every day at 2:00 AM UTC.
Summary
Cron allows you to automate tasks on a schedule using a simple expression.
Each part of the expression defines when the task should run—down to the minute, hour, day, month, or weekday.
DAG of Tasks
What Is a DAG?
- DAG = Directed Acyclic Graph
- Used to maintain dependencies between tasks
- A root task is followed by child tasks
- Scheduling only the root task ensures child tasks execute in order

root task with dependent child tasks forming a DAG
DAG of Tasks – Example
CREATE OR REPLACE TASK TASK_A
WAREHOUSE = COMPUTE_WH
SCHEDULE = 'USING CRON 30 9 * * * UTC'
AS
SQL query 1;
CREATE OR REPLACE TASK TASK_B
WAREHOUSE = COMPUTE_WH
AFTER TASK_A
AS
SQL query 2;
CREATE OR REPLACE TASK TASK_C
WAREHOUSE = COMPUTE_WH
AFTER TASK_A
AS
SQL query 3;
CREATE OR REPLACE TASK TASK_D
WAREHOUSE = COMPUTE_WH
AS
SQL query 4;
ALTER TASK TASK_D ADD AFTER TASK_B;
ALTER TASK TASK_D ADD AFTER TASK_C;
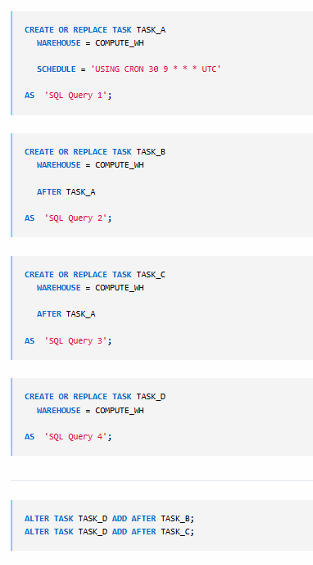
creating root task and dependent tasks using SQL
Explanation of the Code
1. Creating the Root Task (TASK_A)
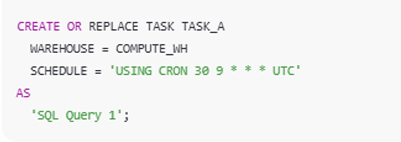
- TASK_A is created with a schedule
- It runs every day at 9:30 AM UTC
- Executes SQL query 1
- TASK_A is the root task
2. Creating Child Tasks (TASK_B and TASK_C)
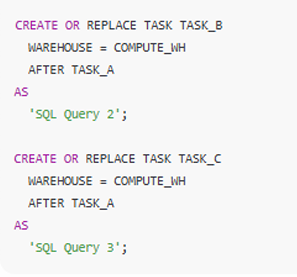
- TASK_B and TASK_C depend on TASK_A
- They run only after TASK_A completes
- Each executes its respective SQL query
3. Creating a Downstream Task (TASK_D)

- TASK_D is created without dependencies initially.
4. Setting Dependencies for TASK_D

- TASK_D runs only after TASK_B and TASK_C finish
How Execution Flows
- At 9:30 AM UTC, TASK_A is triggered
- Once TASK_A completes:
- TASK_B and TASK_C start in parallel
- After TASK_B and TASK_C finish:
- TASK_D executes
This forms a Directed Acyclic Graph. Where:
- TASK_A is the root.
- TASK_B and TASK_C are children of TASK_A.
- TASK_D depends on both TASK_B and TASK_C.
Summary
By scheduling only the root task (TASK_A), all dependent tasks execute automatically in the correct sequence based on defined dependencies, ensuring proper order and data flow.
Task History
We can check task history from the information schema table TASK_HISTORY.
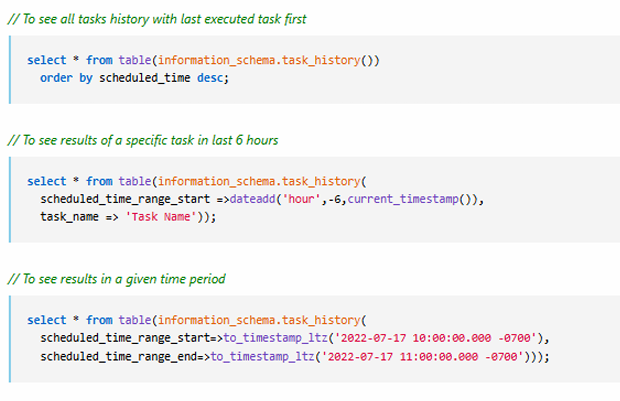
To See All Tasks (Latest Executed First)
SELECT *
FROM TABLE(INFORMATION_SCHEMA.TASK_HISTORY())
ORDER BY SCHEDULED_TIME DESC;
To See Results of a Specific Task in Last 6 Hours
SELECT *
FROM TABLE(INFORMATION_SCHEMA.TASK_HISTORY())
WHERE TASK_NAME = 'TASK_NAME'
AND SCHEDULED_TIME >= DATEADD(HOUR, -6, CURRENT_TIMESTAMP());
To See Results in a Given Time Period
SELECT *
FROM TABLE(INFORMATION_SCHEMA.TASK_HISTORY(
SCHEDULED_TIME_RANGE_START => TIMESTAMP_LTZ('2022-07-17 00:00:00'),
SCHEDULED_TIME_RANGE_END   => TIMESTAMP_LTZ('2022-07-17 11:00:00')
));
Practical Implementation
Create Database and Schema
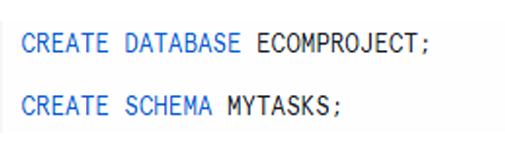
CREATE DATABASE ECOMPROJECT;
CREATE SCHEMA MYTASKS;
Create a Sample Table for Inserting Data Using Tasks
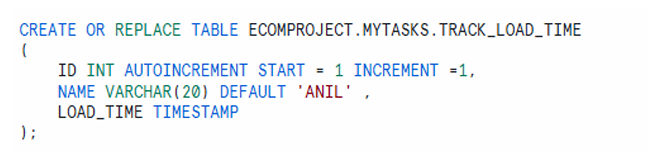
CREATE OR REPLACE TABLE ECOMPROJECT.MYTASKS.TRACK_LOAD_TIME (
ID INT AUTOINCREMENT START = 1 INCREMENT = 1,
NAME VARCHAR(20) DEFAULT 'ANIL',
LOAD_TIME TIMESTAMP
);
Create Task to Insert Data Every Minute
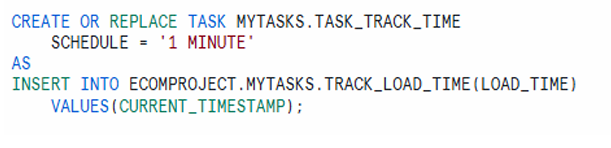
CREATE OR REPLACE TASK MYTASKS.TASK_TRACK_TIME
SCHEDULE = '1 MINUTE'
AS
INSERT INTO ECOMPROJECT.MYTASKS.TRACK_LOAD_TIME (LOAD_TIME)
VALUES (CURRENT_TIMESTAMP);
IMPORTANT NOTE
When we create a task, it will be in a suspended state, so we need to resume it.
To See Tasks
SHOW TASKS;
DESC TASK MYTASKS.TASK_TRACK_TIME;
IMPORTANT NOTE: When we create task, it will be in suspended state as shown above, so we need to
resume it.
To Resume Tasks
ALTER TASK MYTASKS.TASK_TRACK_TIME RESUME;

Console view showing suspended task and resume action
View the Data

SELECT *
FROM ECOMPROJECT.MYTASKS.TRACK_LOAD_TIME;

rows inserted at one-minute intervals
To Suspend Tasks

ALTER TASK MYTASKS.TASK_TRACK_TIME SUSPEND;
IMPORTANT NOTE
When you are practicing, always remember to suspend tasks after completing your work.